|
Windows 10 Updates
1. Open Settings app from Start Menu and go to "Update & security -> Windows Update". 2. Now click on "Advanced options".
3. Uncheck "Give me updates for other Microsoft products when I update Windows". It'll block automatic download of a few updates which are related to various Microsoft products. 4. Enable "Defer feature updates" option. New Windows updates will not be downloaded and installed for several days or months. But security updates will be downloaded immediately. That will ensure you that all Windows updates will receive enough testing before they get installed in your computer.
5. Click on "Choose how updates are delivered" and set the slider to Off under "Updates from more than one place". It'll help you in saving your internet connection bandwidth.
UPDATE: In newer Windows 10 builds (version 1607), you can also adjust "Active Hours" by clicking on "Change active hours" given on Windows Update page. There you can select the time when Windows should not restart your computer to install updates.
You just need to set your Internet connection as Metered connection and Windows will not download new updates on a metered connection. 1. Open Settings app from Start Menu and go to "Network & Internet". 2. Select your Internet connection type from left-side pane and then click on Internet Connection name in right-side pane.
3. Set the slider to On present under "Metered Connection".
Now Windows will not automatically download or install new updates in your computer as far as you keep your Internet connection as Metered. But be sure NOT to click on "Check for updates" or "Download" or it will install all the updates anyways...
LINK: Force Windows 10 to Use Ethernet-Wired Connection as Metered
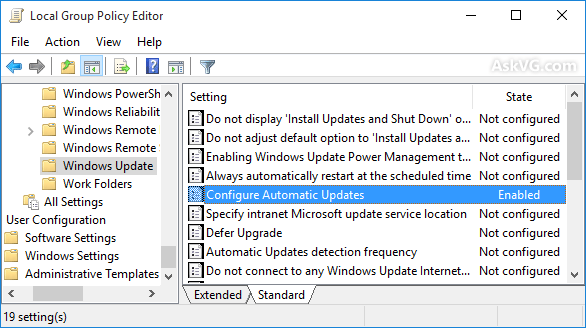
Group Policy (GPEDIT), (Windows 10 Pro has it. Windows 10 Home does't have it): Open Run box, type gpedit.msc and hit Enter to open the Local Group Policy Editor, and navigate to the following setting: Computer Configuration
> Administrative Templates > Windows Components > Windows Update
As soon as you click on the button "Check for the updates", Windows will immediately apply the changes.
If your Windows
does not have GPEDIT, 1. Open Run box, type
regedit
HKEY_LOCAL_MACHINE \ SOFTWARE \
Policies \ Microsoft \ Windows HKEY_LOCAL_MACHINE \ SOFTWARE \
Policies \ Microsoft \ Windows \ WindowsUpdate \ AU
2 – To notify for download and
notify for install 5. Now select AU key and in right-side pane create a new DWORD NoAutoUpdate and set its value to 1
If you decide to enable Windows Update again in future, simply delete the DWORD NoAutoUpdate from Registry. Exit REGEDIT and restart the computer. After reboot, open Windows Update page in Settings app. Now click on "Check for updates" button to force Windows 10 to apply your changes. After that the new settings will be applied successfully. NOTE: If you are using 64-bit edition of Windows, you'll also need to follow steps 3 to 5 for following Registry key: HKEY_LOCAL_MACHINE\SOFTWARE\Wow6432Node\Policies\Microsoft\Windows
Also you can disable "Windows Update" service completely in Windows 10 which will 100% block Windows 10 from downloading and installing updates in your computer. 1. Press Win+R keys together to launch RUN dialog box. Type services.msc in the textbox and press Enter. It'll open Services Manager. 2. Scroll down to bottom and you'll see a service "Windows Update" in the list.
3. Double-click on the service and change its Startup type to Disabled.
That's it. Now try to check for new updates in Windows Update and you'll
see error message 0x80070422: there were some problems installing updates. |