|
WINDOWS 7, 8.1,
10:
ASTUCES ET TRUCS POUR LES RENDRE
PLUS RAPIDE, etc.....
TIPS AND TRICKS TO MAKE
THEM FASTER, etc...
Infos-clés sur le cycle de vie
Windows:
https://support.microsoft.com/fr-ca/help/13853/windows-lifecycle-fact-sheet
Date de sortie de tous les Windows:
**lien1**
**lien2**
Updated: 15 Mai-May 2021

*****************************************
Recently
Microsoft (Windows 10) is harassing us: I got a popop
to force me to put a password account (if I want a local account without
a password it's my biz lol not their !). So I had no choice to put a
password but after
I removed it, hoping that I will have some peace and few months left
before they force
me again to put a password. So here is how to remove this password:
Settings > Accounts > Sign-in options > Password or Reset password :
they will ask you to put the password you already put: put your
password,
then they will ask you to put a new password: don't put any, leave
the 2 password rectangles empty, then click on OK. Voilà :) !
Also I disabled the updates with Wub (Windows Update Blocker)
because I have a older version which I'm happy with, because
if I let the Windows updates enabled they will force me to install
a new version of Windows 10, and with the new version they will
force me to sign-in with a Microsoft account or a Skype account
(Skype belong to Microsoft). That is what happened to me, and I did not
find how to create a local account, which is maybe impossible with
the new version of Windows 10. So I did a restoration of my older
version of Windows 10 (with my image backup I did with Paragon (or
Macrium Reflect, use the program of your choice). So after the
restoration
I disabled the Windows updates with Wub to prevent a forced installation
of a new version of Windows 10.
BUT THE TRICK IS: BEFORE TO
INSTALL A NEW VERSION OF
WINDOWS 10 FROM AN UPDATE OR FROM A NEW INSTALLATION:
DISABLE THE INTERNET: THE OPTION
TO CREATE A LOCAL ACCOUNT WILL APPEAR SOMEWHERE
I THINK AT THE BOTTOM :)
UBitMenu for Office 2007, 2010,
2013 and 2016:
RESTORE THE CLASSICAL MENU, AND IT KEEPS THE RIBBON:
http://www.ubit.ch/software/ubitmenu-languages/
Here is the setup in english (zip)
Comment faire pivoter une vidéo mal orientée avec
Vegas
Glissez le fichier vidéo désiré
dans la chronologie. Clique-droit sur la vidéo > Video Event pac/crop >
Rotation > Angle,
ou tourner le rond et rapetisser à la hauteur de la fenêtre noire.
Une fois votre effet terminé, appuyez tout simplement sur la
croix « X »
dans le coin en haut à droite et votre projet sera enregistré et
fermé.
How adjust brightness and contrast with Vegas
Glissez le fichier vidéo désiré
dans la chronologie. Clique-droit sur la vidéo > Video Event FX >
Vegas Color > Vegas Brightness and Contrast:
sélectionne-le et clique OK: ajuste Brightness & Contrast.
Une fois votre effet terminé, appuyez tout
simplement sur la croix « X »
dans le coin en haut à droite et votre projet sera
enregistré et fermé.
Comment faire pivoter une vidéo mal orientée avec
Filmora (mais Vegas est mieux)
Comment faire pivoter une vidéo mal orientée avec
VLC Player: ca n'a pas marché avec moi
Youtube: vidéos Publiques, Privés, Non Répertoriés:
https://support.google.com/youtube/answer/157177?co=GENIE.Platform%3DDesktop&hl=fr
Ici une image de la page
LE MEILLEUR PROGRAMME POUR
DOWNLOADER DES VIDÉOS:
YOUTUBE, FACEBOOK, ETC:
https://www.winxdvd.com/youtube-downloader/index-fr.htm
https://www.nirsoft.net/utils/run_as_date.html
How to Use the Diskpart Utility to Assign and Remove
Drive Letters
Download Diskpart.zip
https://neosmart.net/wiki/diskpart/#What_is_diskpart
The best and fastest way is to use MiniToolPartitionFree to change a drive
letter,
no need to restart the computer after:
https://www.partitionwizard.com/free-partition-manager.html
Télécharger une image disque Windows 8.1 (fichier ISO):
https://www.microsoft.com/fr-ca/software-download/windows8ISO
Pour mon laptop
Lenovo Ideapad 100s 141 BR:
voir plus bas...

-Je
pense que je vais l'appeler Sarah.
-Je suis désolé, mais ce nom est déjà pris. Cependant, vous pouvez encore
avoir: Sarah4343 ou Sarah_12.
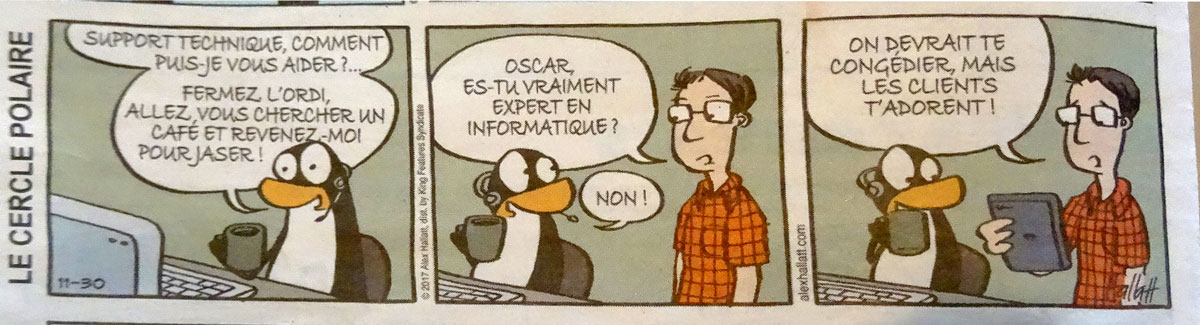
-Technical support, how can I help you?...Close the
computer, get a coffee and come back to me, we will talk!
-Oscar, are you really a computer expert?
-NO!
-We should fire you but the customers love you!
*****************************************
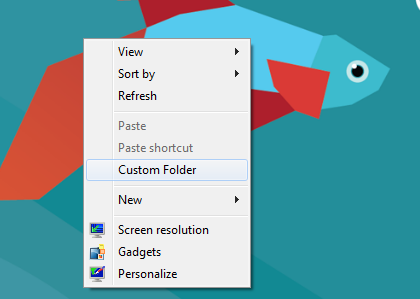
Add Right-Click Menu to Open Any Folder on Windows: SOURCE
The context menu you gain by
right-clicking the desktop is a powerful tool to open any kind of data and
program.
If you have a folder that you need to access regularly it might be a
clever idea to simply pin it to that right-click menu
to shorten the access time.
To achieve that you need to add a few keys to the registry. Open it by
typing regedit into a run prompt which you get by hitting Windows key + R.
In the registry, navigate to the Computer\HKEY_CLASSES_ROOT\Directory\background\shell
key and right-click it to create a new key (New > Key). Give it the name
of the command that shall later appear in the menu (Custom Folder in the
example above). Afterwards right-click the created key and create another
one called command. Left click the command key and change the (Default)
value by double-clicking it. It has to be something like:
explorer.exe C:\Users\howtoforge\Pictures
Replace the path I used with the one
to your folder (embrace it in double-quotes if it contains spaces) and put
the explorer.exe in front of it, so the system knows which program to use
to open the command.
*****************************************
Les CDs audio, avec Nero: Disc-at-Once,
et vitesse de lecture et de gravure: 16x.
Les DVDs je les grave à 4x, et les BDs en 2x.
The CDs audio, with Nero:
Disc-at-Once,
speed of reading and burning: 16x.
The DVDs I burn them at 4x, and the BDs
at 2x.
LES LECTEURS
AMOVIBLES APPARAISSENT 2 FOIS:
C'est
normal: sous
Windows 10, les lecteurs amovibles ont étés ajoutés en en bas du volet de
navigation pour qu'ils soient directement accessible sans avoir à
développer "Ce PC".
Si
vous ne voulez plus les voir deux fois, supprimez ceci:
{F5FB2C77-0E2F-4A16-A381-3E560C68BC83} :
HKEY_LOCAL_MACHINE\SOFTWARE\Microsoft\Windows\CurrentVersion\Explorer\Desktop\
NameSpace\DelegateFolders\{F5FB2C77-0E2F-4A16-A381-3E560C68BC83}
et vous ne verrez plus votre clé deux fois.
Mais plutôt
que de la supprimer, mettez un - devant: -{F5FB2C77-0E2F-4A16-A381-3E560C68BC83}
Si tu
dispose de W10 en 64Bits faire la même chose pour la clé suivante :
HKEY_LOCAL_MACHINE\SOFTWARE\Wow6432Node\Microsoft\ Windows\CurrentVersion\Explorer\Desktop\NameSpace\
DelegateFolders-{F5FB2C77-0E2F-4A16-A381-3E560C68BC83}
Download the last version of
aTubeCatcher:
http://files.dsnetwb.com/aTube_Catcher.exe
or
http://www.atube.me/
LE MEILLEUR PROGRAMME POUR DOWNLOADER DES VIDÉOS:
YOUTUBE, FACEBOOK, ETC:
https://www.winxdvd.com/youtube-downloader/index-fr.htm

Saviez-vous que si vous avez installé Windows
10, une option est cochée par défaut, la voici,
Microsoft va utiliser votre bande passante, VOTRE
INTERNET, pour permettre
à d'autres utilisateurs de télécharger leurs mises-à-jours
depuis VOTRE ordinateur.
En partie seulement ok mais quand même ! Microsoft veut soulager ses
serveurs à vos dépens !
Donc Microsoft s'en foutte si vous payez pour un internet limité.
Sur ce lien vous verrez comment désactiver cette option:
Did you know that if you installed Windows
10, an option is checked by default:
Microsoft will use your bandwidth, YOUR INTERNET,
to allow other users to download their updates from YOUR
computer.
In part only ok but still ! Microsoft wants to relieve its servers at your
expense ! So Microsoft will not care
if you pay for a limited internet. On this link you will see how to
disable this option:
http://www.lemondeinformatique.fr/actualites/lire-microsoft-accapare-la-bande-passante-utilisateur-pour-les-mises-a-jour-windows-10-65791.html
Polices floues ou texte trop petit sur Windows 10 ?
Utilisez ce logiciel
Font or text blurry on Windows 10 ? Use this
software
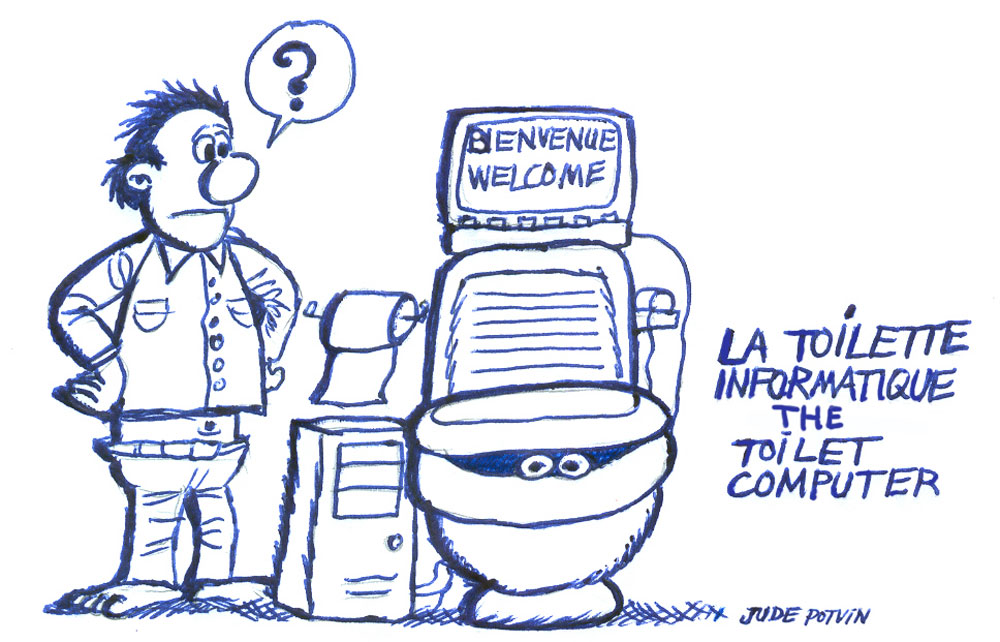
Pour utiliser, insérez votre carte de crédit et remplissez
le formulaire.
Pour flusher, pressez "Delete" ou "Videz le Cache".
Pour réduire le bruit, cliquez sur "Mute".
Pour nettoyer, utilisez l'option "Formater" ou "Restaurer".
Pour déboucher, utilisez l'option "Optimiser" ou "Réparer".
Pour dérouler le papier de toilette, cliquez sur "Télécharger".
Pour colorer le papier de toilette, utilisez Photoshop.
To use, insert your credit
card and complete
the form.
To flush,
press "Delete" or "Empty Cache".
To reduce noise,
click "Mute".
To clean, use the option "Format" or "Restore".
To unblock,
use the option "Optimize" or
"Repair".
To unroll the toilet
paper, click "Download".
To color the toilet
paper, use Photoshop.
*************************************************************************
Comment mettre à jour la liste des serveurs Emule
PARTITION YOUR DISC AS
MBR OR GPT ?
Good to know: the discs as MBR can contain 4 partitions maximum,
so if you want to have more partition on the same disc, you will have to
convert the
disc as GPT. Or if you to keep it as MBR, by example, if you have 5 partitions,
delete 2 partitions and merge them into one partitions so you will have a
total of 4 partitions
then Windows will be able to read them all. (IMP: before to delete your 2
partitions
make sure you save your files in an other disc).
MBR support a disc 2 gig max only.
GPT support a nearly unlimited number of partitions, depending
of your operating system (Windows allows 128 partitions).
And GPT-based drives can be much larger, with size limits dependent
on the operating system and its file systems.
To know more,
click here.
Very good software to capture the screen,
image + sound,
so you can capture any video on the web,
you can select only a part of the screen so only the video:
Très bon programme pour capturer
l'écran: image + son,
alors tu peux capturer n'importe lequel vidéo sur le web,
tu peux sélectionner seulement une partie de l'écran donc seulement le vidéo:
OhSoft/Ocam
My favorites settings:
-25 f/sec
-Quality: Very High
-Key: 1 -Codec:
X-Vid-Mpeg-4
- With Multi. of 8 -Sound: select only: Record system audio et Do not
record microphone
so you can close the speakers during recording.
WINDOWS 10:
Réinitialiser ou Restaurer Windows 10 (PCAstuces)
Drives Appearing Twice in Navigation Pane of Windows
10 Explorer “This PC”
Mode Night Light (Windows 10
v.1709):
On keyboard: key "Windows and A": click on "Expand": "Night Light"
selected in blue = ON.
OR:
Settings / System / Display / Night Light: ON or OFF
Sauvegarder sa licence Windows 10 sur son compte
Microsoft - PCAstuces
(ca fonctionne seulement avec Windows
10 Anniversaire (version 1607) et plus haut)
GRAVEURS CD/DVD/BLURAY NON
RECONNUS PAR WINDOWS 10:
http://forum.hardware.fr/hfr/WindowsSoftware/windows-10/disparition-lecteur-installation-sujet_341581_1.htm
Juste pour
info, j'avais le même soucis (passage Windows 7 à Windows
10 et perte de lecteur DVD) et toutes vos soluces n'ont rien
données. Le lecteur est bien reconnu par le bios mais ni par le
gestionnaire de péripheriques, ni par le gestionnaire de
disques, donc introuvable une fois sous Windows. J'ai également
essayé de modifier le registre sans effets. J'ai donc
essayé de graver un CD et là Windows m'a bien
trouvé mon lecteur-graveur de DVD mais affichait : "lecteur
déconnecté" alors qu'il était alimenté
correctement et que le cable SATA était bien branché.
J'ai donc arrêté l'ordi et j'ai ouvert ma tour afin de
regarder sur quel port était branché mon lecteur DVD. Il
était connecté sur un port SATA attribué
normalement aux Disques Durs (souvent Jaunes) ce qui ne posait pas de
problèmes sous Windows 7. Je l'ai donc connecté à
un port SATA réservé aux autres types de lecteur (Violet
SATA4) et lors du redémarrage de Windows le lecteurs DVD
était revenu et fonctionnait correctement. Conclusion: Je
suppose que Windows 10 fait la différence entre les ports SATA
pour les Disques Durs et ceux réservés pour les lecteurs
CD/DVD. Vérifiez vos branchements.
BURNERS CD/DVD/BLURAY
NOT REGNIZED BY WINDOWS 10:
Just
for info, I had the same worries (passage Windows 7 to Windows 10 and loss of DVD
player) and all your solutions have given nothing. The player is well
recognized by the bios but neither by the device manager nor by the disk
manager, therefore not found once under Windows. I also tried to change
the registry without effects. So I tried to burn a CD and then Windows
found me my drive-recorder of DVD but displayed: "reader disconnected"
while it was powered correctly and that the cable SATA was well connected.
So I stopped the computer and I opened my tour (computer) to look at which port was
plugged my DVD player. It was connected to a SATA port normally assigned
to Hard Disks (often yellow) which did not cause problems under Windows 7. I
therefore connected it to a SATA port reserved for other drive types
(Violet SATA4) and when restarting Windows the DVD players
had returned and worked correctly. Conclusion: I assume that Windows 10 makes
the difference between SATA ports for HardDisc and those reserved for CD/DVD
drives. Check your connections.

-Again in front of the computer ?
-Bah...I tried at the back, I see less well !
I like Windows 10 but the appearance
is not the best:
I don't like the new Start button and the ribbon in the explorer.
Also I lost my button (up-right in the explorer): "Change your view > More
options",
which was very useful to adjust the size of the thumbnails for the
pictures!
(I don't like to use the wheel of the mouse and the CTRL key for that!).
So to get back almost everything like in Windows 7 I use
mostly 3 softwares
which you will find below on this page:
# 1-ClassicShell:
to get back the Start button like in Windows 7 or XP.
# 2-OldNewExplorer:
to get back the explorer like in Windows 7.
# 3-WinAeroTweaker:
to personalise the colors and many more things.
(do not panic: just do CTRL+F and search on this page for the name of
the software you want)
(note that those 3 softwares can be used with Windows 8, 8.1,
and # 1 and # 3 can also be used with Windows 7,
but don't use # 2-OldNewExplorer
with Windows 7 cause that
make it to bug).
*************************
J'aime Windows 10 mais
l'apparence n'est pas fameuse:
Je n'aime pas le nouveau bouton Démarrer ni le ribbon dans
l'explorateur.
Aussi j'ai perdu mon bouton (en haut à droite dans l'explorateur):
"Change your view-vue? > Plus d'options" (scuse: mon Windows est en
anglais!),
qui était très pratique pour ajuster la grandeur des miniatures pour les
images!
(j'aime pas me servir de la roue de la souris et de la clé CTRL pour ca!).
Donc pour retrouver presque tout comme dans Windows 7 j'utilise
principalement 3 logiciels que tu trouveras plus bas sur cette page:
# 1-ClassicShell:
pour retrouver le bouton Démarrer comme dans Windows 7 ou XP.
# 2-OldNewExplorer:
pour retrouver l'explorateur comme dans Windows 7.
# 3-WinAeroTweaker:
pour personnaliser les couleurs et plusieurs autres choses.
(ne panique pas: juste à faire CTRL+F et cherche sur cette page les
noms des logiciels que tu veux)
(note que ces 3 logiciels peuvent être utilisés avec Windows 8, 8.1,
et # 1 et # 3 peuvent aussi être utilisés avec Windows 7,
mais n'utilise pas # 2-OldNewExplorer
avec Windows 7 parce que ca le fait boguer).
How to Make Windows 10 Look and Act More Like
Windows 7
OldNewExplorer for Windows 10 (also 8, 8.1):
Get back the explorer like in Windows
7: no more ribbon, and more:
Retrouve l'explorateur comme dans Windows
7: pas de ribbon, et plus:
http://www.msfn.org/board/topic/170375-oldnewexplorer-118/
------------------------
http://www.softpedia.com/get/Tweak/System-Tweak/OldNewExplorer.shtml
J'aime ces ajustements -
I like those settings:

Je préfère utiliser Ribbon Disabler au lieu de
OldNewExplorer
I prefer to use Ribbon Disabler instead of
OldNewExplorer
---After I
did the settings for OldNewExplorer, I do those one in the explorer in
Windows 10:
-Organize / Layout: select: Menu bar
& Navigation pane.
-Tool: deselect: Show recently...
& select: Show frequently...
-Tool / Folder options / Open File
Explorer: This PC
-Tool:
select:
Open....same windows... & Double-click...
-Tool: Show hidden files
---ClassicShell
& Windows 10:
I like those
settings:
http://www.classicshell.net/
http://classicshell.sourceforge.net/
-Navigation Pane Style:
Windows XP Simple: for the folders expands !
-Settings / Taskbar: select: Customize taskbar & Transparent
/
Taskbar opacity: 75, Taskbar color: 4D3000, Taskbar text
color: FFFFF
-Start Button: Classic Style -Skin: No
skin
-Left to right: -Delete -Navigation pane
-Folder Options -New folder
-View Extra
Large Icons
-View Large icons -Select all -Deselect -View Details
-Rename -Cut -Copy -Paste -Properties -Refresh -Settings
---WinAeroTweaker
& Windows 10: I like those settings:
WinAeroTweaker for all Windows
**Download the last version**
-Aero
Lite:
Set Windows default theme
-Colored Title Bar:
Enable Colored Title Bar
-Menu
et
Windows Title Bar:
20 (clik: Apply)
-Chkdsk
Time Out Boot:
8
-Disable Automatic Maintenance:
Select it
-Disable Downloads Blockings:
Select it
-Disable
Driver Updates: Select: Turn off...
-Disable
Reboot After Updates: Select: Stop...
-Windows Update Settings:
Set Windows Update to Notify Only
-Boot Option:
Turn on Windows 7 like boot menu
-Disable Lock Screen:
select it
-Battery Flyout:
deselect it
-Old Volume Control:
select it
-Windows Version on Desktop:
select it
-Personalization Menu:
select it: Add...
-Power Plan Menu:
select it: Add...
-Run as Admin:
select it: Add...Add...
-Wide Context Menus:
select:
Disable
-Add Windows Update:
select it: Add...
-V Do This:
select it:
Set
-Disable
"Shortcut" Text:
select it
-Shortcut Arrow:
select:
Classic
-Set
Ethernet-(cable) as Metered Connection: select it,
if necessary
-Windows
Defender Tray Icon:
select it
-Activate
Windows Photo Viewer:
yes do it...
-Auto-Update Store Apps:
select:
Disable
-Disable
Cortona: as you want...
-Edge
Download
Folder.......
-Stop Unwanted Apps:
select it: Stop...
-Disable Telemetry:
select it
-Reset Icon Cash:
do it when necessary
-Get
Classics Apps: Gadgets, etc....as you
want...
ONCE IT'S DONE, REBOOT THE COMPUTER !
---WINDOWS 10:
SETTINGS /
PERSONALIZATION / COLORS:
---Windows 10 v.1607:
I like those settings:
-Settings /
Personalization / Colors / Accent Color: choose
the Blue color: 3rd-ème row-rangée, 1st-ère.
"
"
"
/
Autom. pick an accent color for my background:
Deselect
"
"
" / Make Start, taskbar, and action center
transparent: ON
"
"
" / Show Color on Start,
taskbar, and action center: OFF
"
"
" / Show Color on
Title bar: ON
"
"
" / Choose your app mode: Light
---Windows 10 v.1703
& 1709:
I like those settings:
-Settings /
Personalization / Colors / Autom. pick an accent color for my background:
Deselect
"
" "
/ Windows Color: choose the Blue color:
3rd-ème row-rangée, 1st-ère.
"
" "
/ Transparency effects: ON
"
"
" / Show Color on
the following surfaces / Start, taskbar...: Deselect, Title bars:
Select
"
"
" / Choose your
default app mode: Light
*************************************************************
How to fix Windows Update when it gets stuck (all
versions Windows)
How to install the Rollup Update for Windows 7
YOU CAN GET WINDOWS 10 FOR
FREE AFTER THE 29 JULY 2016
BUT FOR UNTIL WHEN ? I DON'T KNOW.
Go to this page.
TU PEUX OBTENIR WINDOWS 10 GRATUITEMENT APRÈS
LE 29 JUILLET 2016 MAIS POUR JUSQU'À QUAND ?
JE NE SAIS PAS.
Va sur cette page.
Windows 10 : la mise à jour gratuite toujours possible avec une clef
d’activation Windows 7 et 8, 8.1
You Can Still Get Windows 10 for Free With a Windows
7, 8, or 8.1 Key
Download Windows 10 ISO, Pro + Home,
Anniversary Update,
v.1607 (July-juillet 2016), français, english, etc :
https://www.microsoft.com/en-us/software-download/windows10ISO/

-Science show that cells cause cancer for the rats.
-I'm surprised !
-Why ?
-I did not know the rats have cells !
******************************************************************
Microsoft publie un outil pour
corriger les bogues de Windows 10
Microsoft publishes a tool to
correct the bugs of Windows 10
*****************************

"C'est quoi ce dossier "Windows 10" qui est soudainement apparu sur mon
ordi?"
What is this folder "Windows 10" that is suddenly appeared on my
computer?"
*****************************
Téléchargez les ISO de Windows 7
Téléchargez les ISO de Windows 8.1
Téléchargez les ISO de Windows 10
Download the ISO of Windows 7
Download the ISO of Windows 8.1
Download the ISO of Windows 10
****************
Windows 10:
The main versions -
Les principales versions:
#1:
Windows 10, 2015_july: version 1507, build 10240 (First
released):
N'est plus supportée
- No more supported
#2:
Windows 10, 2015_november: version 1511, build 10586 (Fall Update):
N'est plus supportée - No more supported
#3:
Windows 10, 2016_july: version 1607, build 14393 (Anniversary Update):
N'est plus supportée - No more supported
With this released, you can format and install it
and enter your key Windows 7 or 8.1
Windows 10
(Anniversary Update) va demander plus de
mémoire:
Cela ne devrait pas être un problème mais il y avait bien longtemps
que le minimum concernant la RAM pour Windows
n'avait pas connu des
exigences à la hausse. Avec la mise à jour anniversaire de Windows 10, il
y aura donc du changement
à ce niveau. Jusqu'à présent, pour une
configuration 32-bits, Microsoft demandait avec Windows 10 un minimum de
1
Go de RAM, tandis qu'avec une configuration 64-bits, ce minimum était de 2
Go (comme avec Windows 7). Mais avec
Windows 10 Anniversary Update de juillet 2016 version 1607, ce sera un minimum de 2 Go pour
les deux types de configuration.
http://www.nextinpact.com/news/99326-windows-10-anniversary-update-recapitulatif-nouveautes-attendues.htm
Windows 10 (Anniversary Update) will ask for more memory:
This should not be a problem but it was
a long time that the minimum RAM for Windows had not known the
requirements on the rise. With the anniversary update of Windows 10, so
there will be change at this level. So far, for a 32-bit configuration,
Microsoft Windows 10 called with a minimum of 1 GB RAM, whereas with a
64-bit configuration, this minimum was 2 GB (like Windows 7). But with
Windows 10 Anniversary Update July 2016 version 1607, it will be a minimum
of 2 GB for both types of configuration.
https://blogs.windows.com/windowsexperience/2016/03/30/windows-10-anniversary-update-brings-new-experiences-and-developer-opportunity/
#4:
Windows 10, 2017_march: version 1703, build 15063 (Creators Update):
https://www.howtogeek.com/278132/whats-new-in-windows-10s-creators-update/
#5:
Windows 10, 2017_september: version 1709, build 16299.15 (Fall Creators Update):
https://www.howtogeek.com/306610/whats-new-in-windows-10s-fall-creators-update/
#6:
Windows 10, 2018_march: version 1803, (Spring Creators Update):
https://www.howtogeek.com/340688/whats-coming-in-windows-10s-redstone-4-update-available-march-2018/
#7:
Windows 10, 2018_october: version 1809:
https://www.howtogeek.com/353165/whats-new-in-windows-10s-redstone-5-update-available-fall-2018/
#8:
Windows 10, 2019_may: version 1903 (19H1) (released in May 2019):
https://www.howtogeek.com/402569/everything-new-in-windows-10s-april-2019-update/
Windows 10:
Historique des versions -
Version history
****************
http://windows.microsoft.com/en-ca/windows7/products/system-requirements
http://windows.microsoft.com/fr-ca/windows7/products/system-requirements
Run: winver.exe or winver = build
number, etc...
Windows 10 : Différer les mises à jours bloqué
Computer keyboard key explanations:
http://www.computerhope.com/keys.htm
****************
Windows keys:
--link1--
--link2--
--link3--
Win.key + I = Settings
Win.key + R = Run
Win.key + A = Action Center
Win.key + S = Search (bottom-left)
Win.key + D = Display & Hide Desktop
Win.key + L = Switch Accounts
Win.key + arrows keys = snap app. windows left, right, etc...
(also click right on the taskbar: Shows (2 or more) windows side by side,
etc...)
Win.key + Home = Minimize all except the active windows (do again to
restore)
Control + F = Search (top-right)
Control + Shift + Escape = Task Manager
Alt + Tab = switch between open windows or apps
Control + Alt + Tab = view open windows or apps
Run: winver.exe = About Windows = build, etc...
****************
Paramétrer les options de vie privée--Clubic
Comment bloquer la collecte de données de Microsoft sous Windows 10--BHMag
(à mettre dans le
fichier Host
-
to put in the Host file)
Bloquer la collecte de données automatique dans Windows 10--PCAstuces
Désactiver les fonctions de surveillance de Windows 10
Régler les paramètre de vie privée de Windows
10
Préférences d’annonces personnalisées Microsoft
Windows 10 How To Stop It Spying On You & Logging
Your Activity--Youtube
Infos-clés sur le cycle de vie Windows
Windows lifecycle fact sheet
-----------------------
Lien-link website Jude Potvin's caricatures

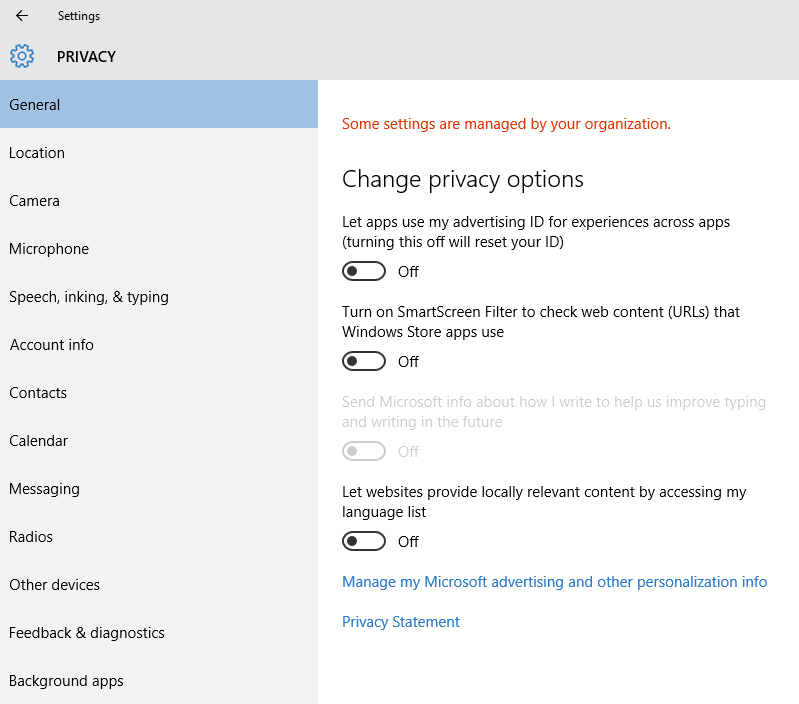
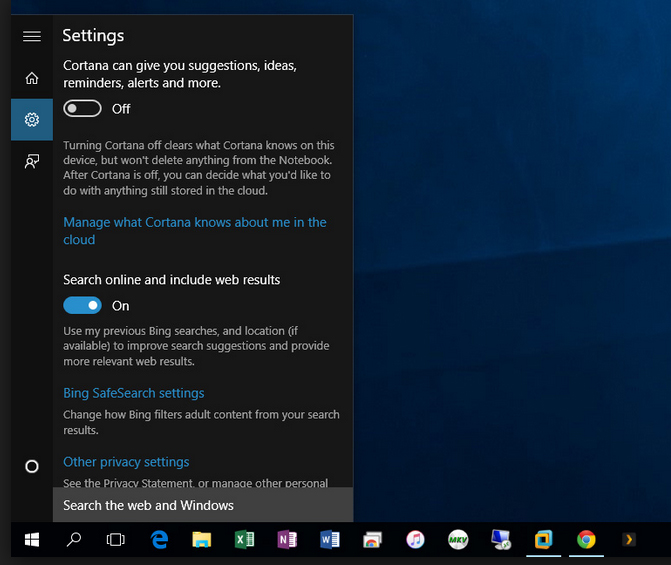
To prevent Windows 10 to send stuff, put everything to OFF:
General, Location, etc...(see the 2 next images):
Pour empêcher Windows 10 d'envoyer des choses, met tout à OFF:
General, Location, etc..(voir les 2 images suivantes):

Updates:

I like also those settings:
Is it better to select: Give me updates for other Mic.Products...?
Select: Defer upgrades, not to install upgrades
that are
not yet tested:
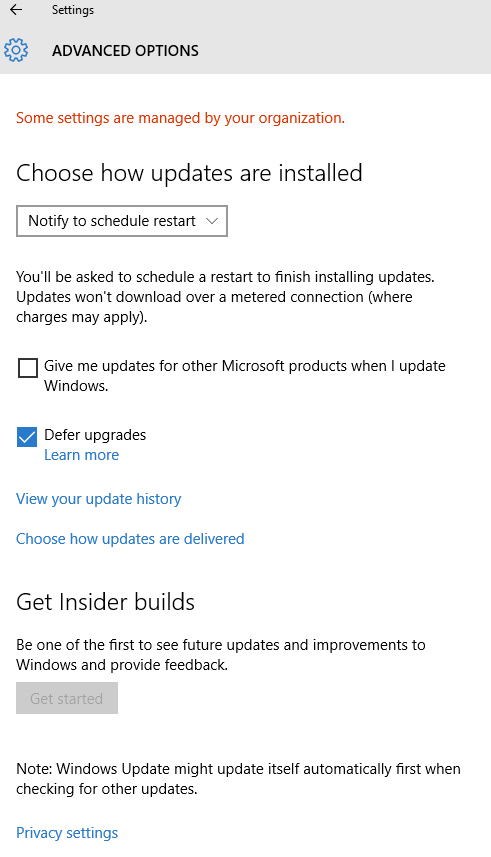
I disable those 2 next:
-
Je désactive ces 2 suivants:
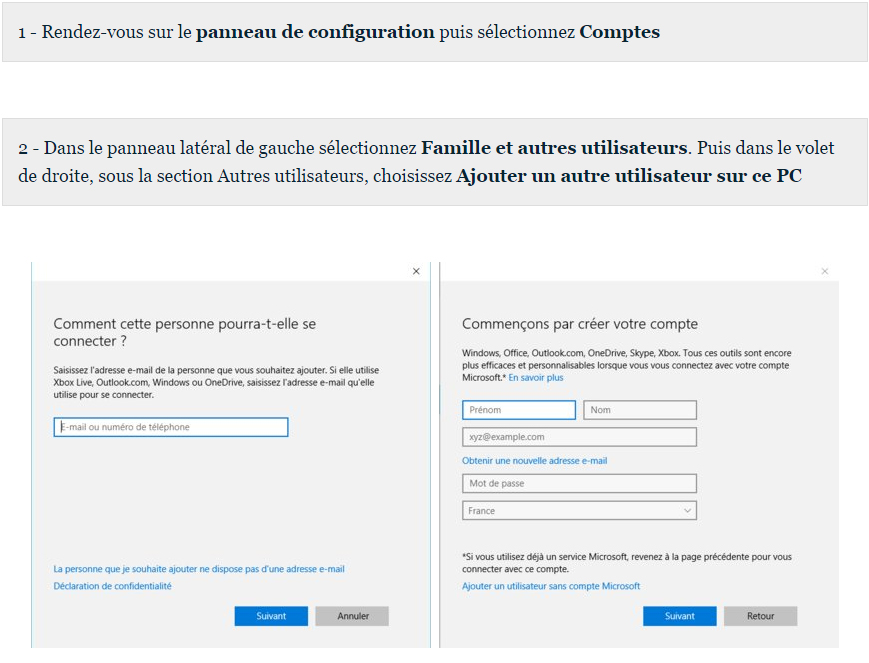
Créez un compte local:
Create a local account:
Relax my friend, they
invented the BLURAY but I'm still there...
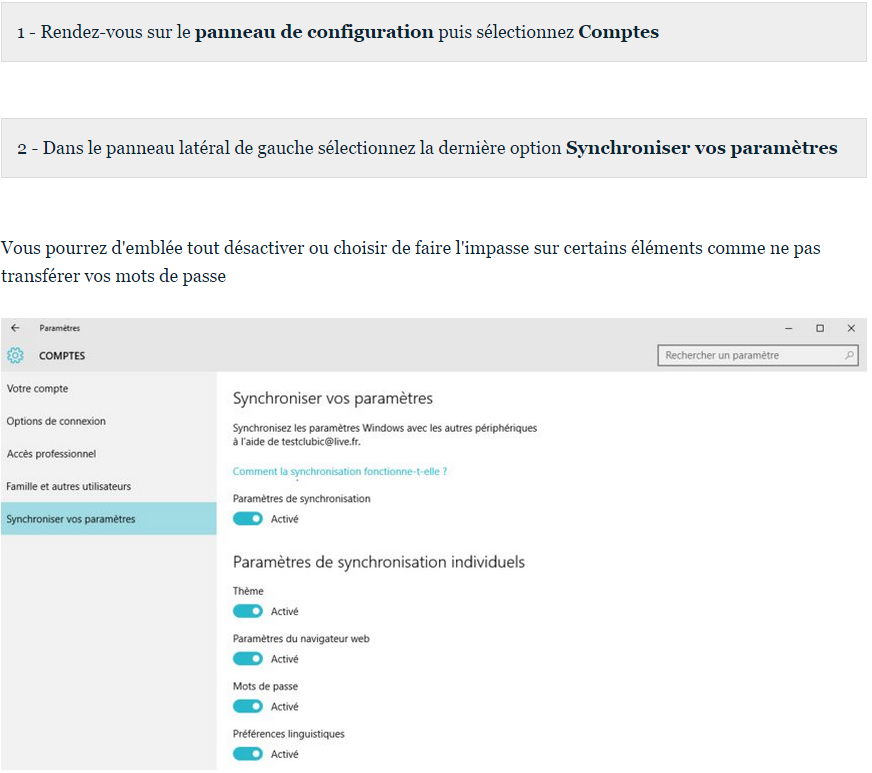
Synchronisation, things to desactivate:
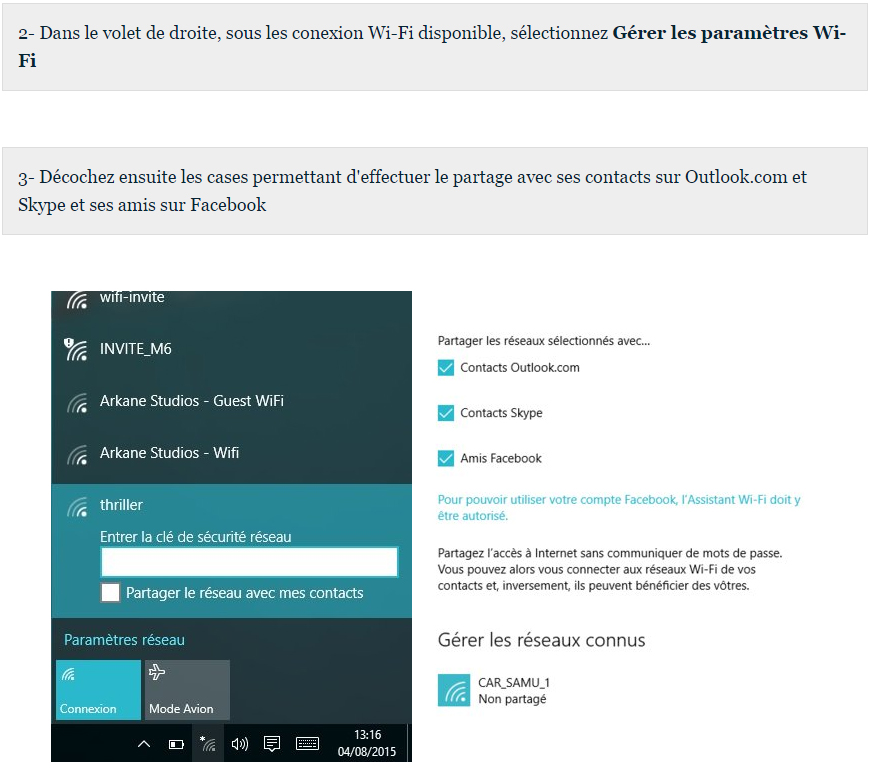
Wifi:
Prenez garde au WiFi partagé par défaut Pour une raison qui nous échappe,
Microsoft a choisi de partager le WiFi par défaut sur Windows 10. Cela
peut vous être utile si vous souhaitez utiliser votre ordinateur comme
"modem" dans certains cas mais ce n'est pas très sécurisé. Si vous n'en
avez pas une utilité immédiate, rendez-vous dans les Paramètres (via le
menu Démarrer) et cliquez sur "Réseau et Internet". Là, cliquez sur le
lien intitulé "Gérer les paramètres WiFi" et là, désélectionnez toutes les
options sous le titre "Partager les réseaux sélectionnés avec…". Fermez
ensuite la fenêtre en cliquant sur la fenêtre en haut à droite. Par la
même occasion, nous vous conseillons de décocher "Se connecter, selon les
suggestions fournies, aux points d'accès Internet ouverts" et "Me
connecter aux réseaux de mes contacts". Il vaut toujours mieux garder la
main sur ces paramètres.
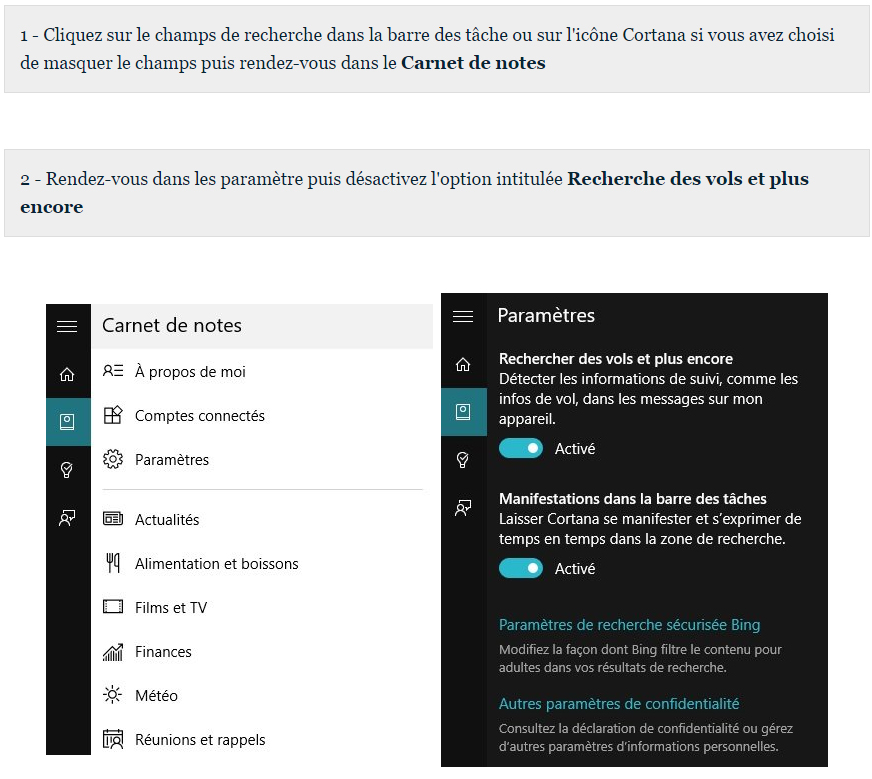
Cortona, things to desactivate:
Edge, things to desactivate:
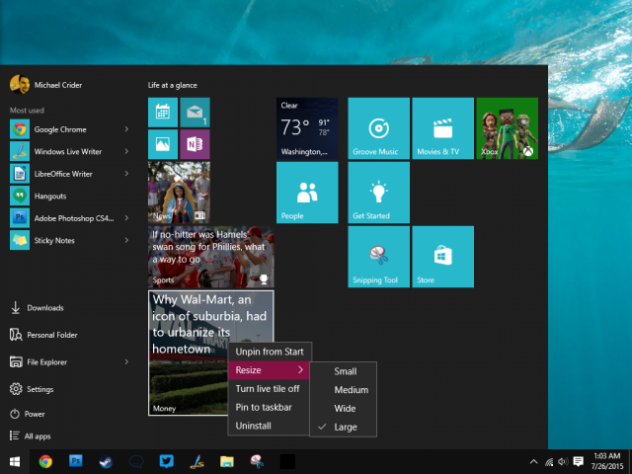
Enlever la publicité dans le Menu Démarrer:
Paramètres -> Personnalisation -> Démarrage: met à OFF:
"Montrer occasionnellement des suggestions au démarrage":
Remove the pub in the Start Menu:
Settings -> Personalization -> Start: put OFF: "Occasionally show
suggestions in Start":
 
C'est arrivé en installant Windows 8: il a
reçu plusieurs "tuiles" sur la tête !
It happened while installing Windows 8: he got hit on his head with many
"tiles" !
*************************
Pour plus de détails voir ces site
-
For more details see those site:
Under Metered connection, you can toggle Set as metered connection to On
*************************
Windows Updates:
How to Prevent Windows 10 From Automatically
Downloading Updates
How, When, and Why to Set a Connection as Metered on
Windows 10
How to Set an Ethernet Connection as Metered in
Windows 8 and 10
(it's more easy with WinAeroTweaker, see up)
How to Set a Wifi Connection as Metered in
Windows 10 version 1607 Anniv.Update
How to Gain Full Permissions to Edit Protected
Registry Keys
(note: with a metered connexion in Windows 10:
Don't click on "Check for Updates" or "Download" because that will
install all the updates, even the version 1607 if you use the 1511.
If Defender is not updated, do it manually once a week, go to this page:
https://www.microsoft.com/security/portal/definitions/adl.aspx
Saving Regedit Favorites in a .reg file
********************************************************
Forcing Windows 10 to Always Notify Before Downloading Updates:
METHODS A to E
********************************************************
Registry Script Remove-Folders-From-This-PC-on-Windows-10 .zip
---- ----- ----- ----- ----
----
Windows 10: Create
a Windows Update Shortcut:
(best way:
use WinAeroTweaker and Add Windows Update in the Control Panel
then go in Control Panel and right click on Windows Update to create a
shortcut on the desktop)
To Download a Windows Update Shortcut:
1. Click/tap on the Download button
below to download the .zip file below.
2. Windows_Update_shortcut: --.zip1--
or --zip2--
3. Open the .zip file, and extract
(drag and drop) the shortcut to your desktop.
4. If you like, you can Pin to
Taskbar, Pin to Start, add to All apps, add to Quick Launch, assign a
keyboard shortcut to, or move this shortcut to where you like for easy
use.
5. When finished, you can delete the
downloaded .zip file if you like.
To Manually Create a Windows
Update Shortcut:
1. Right click or press and hold on
an empty area on your desktop, and click/tap on New and Shortcut.
2. Copy and paste the location below
into the location area, and click/tap on Next. Note Note If you do not
have a US English Windows 10 installed, then you will need to change the
en-US
folder name in the command below for the folder name with your language
instead for this to work.
%windir%\explorer.exe %localappdata%\Packages\windows.immersivecontrolpanel_cw5n1h2txyewy\LocalState\Indexed\Settings\en-US\AAA_SystemSettings_MusUpdate_UpdateActionButton.settingcontent-ms
(NO SPACES)
3. Give a name and put an icon.
All Windows:
Create a Command Prompt Shortcut:
see steps up but put:
%windir%\system32\cmd.exe
-------------------------------------------------
-Windows 10:
créer un Repair Disc:
Search: File History, click on File History, click on System Image Backup
at bottom left.....
-Windows 10:
Afficher tous les lecteurs:
dans l'explorateur, ouvrez l'onglet Fichier. Cliquez
sur Modifier les options des dossiers et de recherche. Ouvrez l'onglet
Affichage. Décochez alors la case Masquer les lecteurs vides.
Voir PC-Astuces.
-----------------------------------
Windows 7, 8.1,
10:
Disable CHKDSK on Windows 7 via
Regedit:
HKEY_LOCAL_MACHINE\SYSTEM\CurrentControlSet\Control\Session
Manager
In the right hand pane, double click BootExecute.
The default value of the key is
autocheck autochk *
* means every drive is checked for
consistency. Just add /K:C at the end before *. /K switch will disable
autocheck on C: drive at Windows startup. So the final value should look
like this:
autocheck autochk /k:C *
If you want to add more drives, the
key should look like this: (disabling C and D drives) autocheck autochk /k:C
/k:D *
If you want to restore everything to
default, just replace the key with the default one i.e. autocheck autochk
*
How to Stop Windows from Adding “- Shortcut” to
Shortcut File Names
(best way: use WinAeroTweaker)
How to fix Windows Update when it gets stuck (all
versions Windows)
How to install the Rollup Update for Windows 7
(bah! don't do that: it's as long as to
do regular updates!)
Avec Windows 8, 8.1: dans le
bios désactive le UEFI pour pouvoir
booter un DVD et par exemple installer Windows 7, mais il faut réactiver
le
UEFI après, je pense....
With Windows 8, 8.1: in the bios
disable the UEFI to be able
to boot a DVD ex: to install Windows 7, mais you have to
enable the UEFI after, I think...


- Que fais-tu
là grand-papa ?
- Je sépare le disque dur en 2 parties, comme c'est recommandé.
-What are you doing, grandpa ?
- I'm separating the hard drive in 2 parts, as it is recommanded.
*****************************************
WINDOWS ALL VERSIONS:
We cannot install anymore Security Essential & Skype on
Windows XP
WinAeroTweaker for all Windows
**Download the last version**
Garder plus d'icônes en mémoire et éviter les icônes corrompues
Regedit:
HKEY_LOCAL_MACHINE, SOFTWARE, Microsoft, Windows, CurrentVersion,
Explorer.
Cliquez sur le menu Edition, sur Nouveau puis sur Valeur chaîne.
Nommez la nouvelle valeur
Max Cached Icons
puis double cliquez dessus.
Saisissez la nouvelle taille du cache en Ko. Par exemple 8192 pour 8 Mo.
Validez par OK.
Fermez l'éditeur du Registre et redémarrez votre ordinateur pour appliquer
la modification.
Google Voice setup:
---.exe---
---.rar---
Il est disponible au Québec mais seulement si
vous mettez votre compte en anglais!
Change la langue de ton interface lorsque tu veux faire des appels.
It is available in Quebec but only if you put
your account in english!
Change the language of your interface when you want to make calls.
Hangout Desktop -
Hangout for Chrome
Microsoft Security Essential antivirus:
(choose your language and x86(32.bit) or x64(64.bit))
page francaise:
http://windows.microsoft.com/fr-ca/windows/security-essentials-all-versions
english page:
http://windows.microsoft.com/en-ca/windows/security-essentials-all-versions
Windows Defender and Microsoft
Security Essentials: Which one do I need?
What is Windows Defender Offline?
Microsoft OneDrive:
page francaise:
https://onedrive.live.com/about/fr-ca/download/
english page:
https://onedrive.live.com/about/en-ca/download/
SP1 for Windows 7:
page francaise:
http://www.microsoft.com/fr-fr/download/details.aspx?id=5842
english page:
http://www.microsoft.com/en-us/download/details.aspx?id=5842
Choose the ISO:
7601.17514.101119-1850_Update_Sp_Wave1-GRMSP1.1_DVD.iso
or
windows6.1-KB976932-X64.exe or windows6.1-KB976932-X86.exe
Download
Internet Explorer 8 for Windows XP,
Vista:
http://windows.microsoft.com/fr-ca/internet-explorer/ie-8-worldwide-languages
http://windows.microsoft.com/en-ca/internet-explorer/ie-8-worldwide-languages
Download
Internet Explorer 9
for Windows Vista, 7:
http://windows.microsoft.com/en-us/internet-explorer/ie-9-worldwide-languages
Download
Internet Explorer 10
for Windows 7.sp1:
http://windows.microsoft.com/en-us/internet-explorer/ie-10-worldwide-languages
Download
Internet Explorer 11
Preview for Windows 7.sp1, 8:
http://windows.microsoft.com/en-us/internet-explorer/ie-11-release-preview
http://windows.microsoft.com/fr-ca/internet-explorer/ie-11-release-preview
http://windows.microsoft.com/en-us/internet-explorer/ie-11-faq
http://windows.microsoft.com/fr-ca/internet-explorer/ie-11-faq
************************************************
Tools / Internet Options / Security /
Internet / Custom Level / Allow websites to
prompt for information using scripted windows: Enable
Taille du texte-text
size:
grande-large.
------------------------------------------------------------------------------------------------------------------------------------
Firefox: how to save a .swf:
Tools--Page Info--Media: Click Save As.
Firefox: put in the adress bar: about:config, then do Enter:
Click 2 times on: Permissions.default.image: Value to 1 = images will
load, to 2 = images will not load.
--------------------------------------------------------------------------------------
FLASH PLAYER VIDEOS PROBLEMS
Si les vidéos ne jouent
pas bien,
clique droit sur le vidéo et va dans
"Paramètres" et décoche: "Activer l'accélération matérielle" :
http://www.macromedia.com/support/documentation/fr/flashplayer/help/help01.html
If the videos does not play well, click right on the
video and go to
"Settings" and deselect: "Enable hardware acceleration" :
http://www.macromedia.com/support/documentation/en/flashplayer/help/help01.html
Sur un laptop de faible CPU, avec
Chrome, Opera, IE, ca jouait saccadé
et le CPU atteignait 100%. J'ai essayé avec Edge et mon CPU était
à 80-85% et les vidéos se sont mis à bien jouer.
With a laptop with weak CPU, with Chrome,
Opera, IE, it was playing jerky
and the CPU was at 100%. I tried with Edge and my CPU was
at 80-85% and the videos was playing well.
--------------------------------------------------------------------------------------
 
Windows, les options
d'installation:
MISE-À-NIVEAU: conservera les fichiers +
paramètres + programmes.
PERSONNALISÉE:
installe une nouvelle copie de Windows, cette option ne conserva pas les
fichiers + paramètres + programmes, et va créer un dossier "old" qui contiendra l'ancien Windows et
que vous pourrez effacer avec l'option Nettoyage de Disque: clique droit
sur C et Propriété...
FORMATER ET INSTALLER À PARTIR DE ZÉRO: bootez sur le DVD ou
la clé USB, attention: cette option ne conservera rien.
INSTALLER UN
2ème WINDOWS EN DUAL BOOT SUR UNE AUTRE PARTITION: pour les
détails je vous laisse chercher un guide sur internet.
Windows, the options of installation:
UPGRADE: will keep the files + settings +
programs.
PERSONNALISED: install a new copy
of Windows, this option will not keep the files + settings + programs, and
will create a folder "old" which will keep the old Windows and that you
will be able to delete with the option Disk Cleanup: click right on C and
Properties...
FORMAT AND INSTALL FROM ZERO: boot on the DVD or
the USB key, attention: this option will keep nothing.
INSTALL A 2nd
WINDOWS AS A DUAL BOOT IN AN OTHER PARTITION: for details I let
you look for a guide on the internet.
--------------------------------------------------------------------------------------
Vous n'arrivez pas à
mettre la main sur votre clé de Windows ? Pourtant, si vous devez le
réinstaller suite à des problèmes, vous en avez absolument besoin. Grâce à
un simple script et sans installer de logiciel, voici comment récupérer la
clé produit de votre Windows. Ouvrez le bloc-notes en cliquant sur son
raccourci dans le menu démarrer.
Recopiez-y le code suivant.
Set WshShell = CreateObject("WScript.Shell")
MsgBox ConvertToKey(WshShell.RegRead("HKLM\SOFTWARE\Microsoft\Windows NT\CurrentVersion\DigitalProductId"))
Function ConvertToKey(Key) Const
KeyOffset = 52 i = 28 Chars = "BCDFGHJKMPQRTVWXY2346789" Do Cur = 0 x = 14
Do Cur = Cur * 256 Cur = Key(x + KeyOffset) + Cur Key(x + KeyOffset) = (Cur
\ 24) And 255 Cur = Cur Mod 24 x = x -1 Loop While x >= 0 i = i -1
KeyOutput = Mid(Chars, Cur + 1, 1) & KeyOutput If (((29 - i) Mod 6) = 0)
And (i <> -1) Then i = i -1 KeyOutput = "-" & KeyOutput End If Loop While
i >= 0 ConvertToKey = KeyOutput End Function
Cliquez sur le menu Fichier puis sur
Enregistrer sous.
Déroulez la liste Type et
sélectionnez l'option Tous les fichiers (*.*).
Donnez un nom au script en le
suivant de l'extension .vbs, CléWindows.vbs par exemple.
Choisissez l'endroit où enregistrer
le fichier, sur le Bureau par exemple pour plus de simplicité et cliquez
sur Enregistrer.
Fermez le bloc-notes. Pour connaître
votre clé produit, double cliquez simplement sur le fichier CléWindows.vbs
sur votre Bureau.
La clé produit de Windows est
affichée à l'écran. Notez-la. Vous pouvez aussi la copier avec le
raccourci clavier Ctrl + C puis la coller dans un document avec le
raccourci clavier Ctrl + V.
Clé Windows
Script .rar
Source:
http://www.pcastuces.com/pratique/astuces/4279.htm
------------------------------------------------------------------------------------------------------------------------------------------
 
Windows 7, 8.1, 10: invite de-commande prompt as
Admin:
Verify your activation:
slmgr /xpr
To change the key of Windows -
Pour changer la clé de Windows:
slmgr -ipk xxxxx-xxxxx-xxxxx-xxxxx-xxxxx
press enter and see the message that says if
it's accepted.
fait entrée et voir le message qui va dire si
c'est accepté.
Pour voir la date d,expiration de l'activation:
To see expiration date of the activation:
Cscript Slmgr.vbs dli
ou-or
slmgr -xpc
autres-others:
slmgr -dli
slmgr -rearm
------------------------------------------------------------------------------------------------------------------------------------------
-Windows 8.1:
Start Charming 4.41, for Windows 8, 8.1
Get most recent version-Obtenez la plus récente
version:
http://nodnarbsoftware.20m.com/index.html
-----------------------------------------------------------------------------------------------------------------------------------------
-Windows 7, 8.1:
WindowsUpdateNotifier-v_1_4_2-for_win_7_8_8.1
---.rar--- ou/or
---.exe---
------------------------------------------------------------------------------------------------------------------
-Windows 7, 8.1:
Windows_Defender_Icon_taskbar-for_Win_8_8.1
---.rar---
ou/or
---.exe---
------------------------------------------------------------------------------------------------------------------
-Windows 8.1, 10:
Pour remettre les gadgets sous Windows 8, 8.1
To put back the gadgets under Windows 8, 8.1
-Windows 7, 8.1, 10: Weather Eye (Meteo Media)
Gadget:
---.rar---
ou/or
---.exe---
------------------------------------------------------------------------------------------------------------------
-Windows 10: Photo
Viewer comme/as Windows 7:
---.zip---
------------------------------------------------------------------------------------------------------------------
-All Windows: EasyBCD
2.2 & iReboot 2.0.1 ---both .rar---
Link EasyBCD
- Link
iReboot
------------------------------------------------------------------------------------------------------------------

CDImage.exe,
CDImage.zip:
pour créer un DVD Windows 7, 8, 8.1 toutes versions:
to create a DVD Windows 7, 8, 8.1 all versions:
1-met le contenu du DVD Windows 7 dans la partition D
dans un dossier nommé: DVDWin7 et met cdimage.exe dans D:
put content of DVD Windows 7 in partition D in
a folder called: DVDWin7 and put cdimage.exe in D:
2-va dans Sources et
sélectionne le fichier ei.cfg et supprime-le.
go in Sources
and select the file ei.cfg and delete it.
3-ouvre l'Invite de Commande
en Admin et saisis la commande
cd C:\
et fait Entrée.
open Command
Prompt in Admin and put this command
cd C:\
and do Enter.
et toujours dans l'invite de
commandes-and always in Command
Prompt:
cdimage.exe -lWINDOWS7_DVD -m
-u2 -bD:\DVDWin7\boot\etfsboot.com D:\DVDWin7\ D:\WINDOWS7.iso
et fait Entrée-and do
Enter.
4-ca va créer dans ta partition D un
.iso bootable de Windows 7 universel-toutes-versions.
that will create in
your partition D an .iso bootable of Windows 7 universal-all-versions.
5-grave l'iso sur un DVD avec Nero
ou autres, ca va faire ton DVD Windows 7
universel-bootable-toutes-versions: Familiale +
Pro + Intégrale, etc...
Burn the iso on a DVD with Nero or others, that will make your DVD Windows
7 universal-bootable-all-
versions: Home + Pro + Ultimate, etc...
(ma clé Windows-7-Intégrale-sans-SP1
a fonctionné pour Windows-7-Intégrale-avec-le-SP1: youppi!)
(my key Windows-7-Ultimate-no-SP1
worked for Windows-7-Ultimate-with-SP1: youppi!)
Sources:
---Télécharger les fichiers ISO de Windows 7 avec le SP1 intégré
---Créer un DVD universel d'installation - Windows 7
--- Créer un DVD de Windows 7 bootable
--- Essayer gratuitement Windows 7 pendant 120 jours
--- Changer la langue de Windows
------------------------------------------------------------------------------------------------------------------------------------
--Toshiba Recovery Disc Creator
(to create the DVDs that will allow you to restore Windows from factory):
Start button / Programs / Recovery Media Creator...
--To
use the "Toshiba Recovery Wizard" from the image partition: boot the
laptop and press the 0 key,
choose the option for a full recovery factory default, this will
format and remove all virus but all
datas will be deleted, make a backup before.
--To
use the "Toshiba Recovery Wizard" from the DVDs, insert the DVD 1, boot
the laptop, press the key
F12, choose CD-DVD, press enter and choose the option for a full
recovery factory default, this will
format and remove all virus but all datas will be deleted, make a
backup before.
--To
recover with the partition: on or restart, F8, Repair..., Toshiba Recovery
Wizard, 64 bit if necess., select: keep
recov. images for all languages....
------------------------------------------------------------------------------------------------------------------------------------------------------------

-Windows 8, 8.1:
To restore from the partition: restart the computer holding Shift key...
Pour restaurer à partir de la partition: redémarre l'ordinateur et tient
Shift...
OR-OU:
REMOVE EVERYTHING AND REINSTALL
WINDOWS:
All of your personal files will be deleted and your settings will be reset.
All apps that you installed will be removed.
Only apps that came with your PC will be reinstalled.
1-Swipe in from the right edge of the screen, tap Settings, and then tap
Change PC settings.
(If you're using a mouse, point to the upper-right corner of the screen, move
the mouse pointer down,
click Settings, and then click Change PC settings.)
2-Tap or click Update and recovery, and then tap or click Recovery.
Under Remove everything and reinstall Windows, tap or click Get started.
3-Follow the instructions on the screen.
TOUT SUPPRIMER ET RÉINSTALLER
WINDOWS:
Tous vos fichiers personnels seront supprimés et vos paramètres
réinitialisés.
Toutes les applications que vous avez installées seront supprimées.
Seules celles fournies avec votre PC sont réinstallées.
1-Faites un balayage à partir du bord droit de l’écran, puis appuyez sur
Paramètres et sur Modifier les paramètres du PC.
(Si vous utilisez une souris, pointez dans le coin supérieur droit de l’écran,
déplacez le pointeur vers le bas,
cliquez sur Paramètres, puis sur Modifier les paramètres du PC.)
2-Appuyez ou cliquez sur Mise à jour et récupération, puis sur
Récupération.
Sous Tout supprimer et réinstaller Windows, appuyez ou cliquez sur Commencer.
3-Suivez les instructions qui s’affichent à l’écran.
---------------------------------------------------------------------------------------------------------------------------------------------------------------

-Windows 8, 8.1:
POUR REMETTRE LE BOUTON DÉMARRER AVEC UN LOGICIEL TIERS:
ce programme est le meilleur: il copie les fichiers de ton
DVD-Windows-7 et les colle dans ton ordinateur-Windows-8:
TO PUT BACK THE START BUTTON WITH A SOFTWARE:
this program is the best: it copies the files from your
DVD-Windows-7 and paste them in your computer-Windows-8:
Ex7forW8 .exe
Met dans ton lecteur ton DVD
Windows 7 la même langue
et le même environnement (32 ou 64 bit) que ton Windows 8.
Exécute le programme Ex7forw8.
Specify a path...: laisse-le par défaut: "C\Windows\explorer7."
Sélectionne: "Create shortcut and uninstall entry for all users."
Puis choisi l'un ou l'autre au besoin:
"Use Windows 7 explorer" pour éviter l'interface Modern UI
et pour retrouver le bouton démarrer de Windows 7.
Ou: "Use Windows 8 explorer" pour ôter le bouton démarrer de Windows 7
et retrouver l'interface Modern UI.
Pour choisir l'explorateur 7 ou 8, va dans les programmes / Ex7forw8 /
Switch shells.
Put in your reader your
DVD Windows 7 same language
and same environment (32 or 64 bit) than your Windows 8.
Execute the programm Ex7forw8.
Specify a path...: leave it by default: "C\Windows\explorer7."
Select: "Create shortcut and uninstall entry for all users."
Then choose one or the other, as you need:
"Use Windows 7 explorer" to avoid the interface Modern UI
and to find back the start button of Windows 7.
Or: "Use Windows 8 explorer" to remove the start button of Windows 7
and find back the interface Modern UI.
To choose the explorer 7 or 8, go in the programs / Ex7forw8 / Switch
shells.
Lien en francais
If you don't have a DVD Windows 7, you can install:
Si tu n'as pas de DVD Windows 7, tu peux installer:
StartMenu_8_v.1.4.0.908-free-gratuit-francais-english-etc .exe
StartMenu_8_v.1.4.0.908-free-gratuit-francais-english-etc .rar
ou si tu veux plus simple
/ or if you want more simple:
http://thesz.diecru.eu/content/spencer.php
-------------------------------------------------------------------------------------------------------------------------
-Windows 8, 8.1:
Remettre un Menu Démarrer dans
Windows 8-8.1 sans installer de logiciel tiers:
To put a Start Menu
in Windows 8-8.1 without install a program:
cliquez dans la
barre des tâches, en bas
de votre écran, avec le clic droit, puis dans
"barre d'outils" et
"nouvelle
barre d'outils". Ensuite allez dans
"C" puis
"ProgramData" puis
"Microsoft" puis
"Windows", puis sélectionnez sans l'ouvrir le dossier
"Menu Démarrer" et cliquez en bas sur
"Sélectionner un dossier" et vous aurez "menu démarrer" qui s'affichera dans la barre d'outil en bas à droite,
tu peux la glisser à gauche. (pour voir ProgramData, il faut cocher:
Montrer les dossiers cachés, dans les options de l'explorateur.)
Click right on the task bar / tool bar
/ new tool bar / go to C: / ProgramData / microsoft / windows / select
Start menu / click at bottom on Select a folder, and you will have a start
menu on the toolbar at the bottom right, you can drag it on the left. (to
see ProgramData you have to select Show hidden files, in the options of
the explorer.)


-Est-ce que
cette app vide la batterie?
-Non, seulement ton porte-monnaie.
-------------------------------------------------------------------------------------------------------------------------------------------------
-Windows 7 & 8.1:
POUR
REMETTRE QUELQUES ICONES
DE PLUS DANS L'EXPLORATEUR ET METTRE
LE MENU DÉMARRER CLASSIQUE SEMBLABLE À XP:
TO PUT BACK SOME MORE ICONS IN THE EXPLORER
AND PUT THE START MENU CLASSIC SIMILAR TO XP:
Don't put more recent version: you
would loose the settings for the
explorer-icons.
Ne met pas de version plus récente: tu perdrais les
ajustements pour les
icônes dans l'explorateur.
ClassicShell Menu 2.8.3 for Vista et 7, 2010-aout-4 .exe
Cette version ne peut pas
s'installer sur Windows 10.
This version cannot be installed on Windows 10.
Une fois installé,
ouvre Windows Explorer / Clique droit sur la barre des
menus et coche: "Classic Explorer Bar". Déverrouille la barre et met les
boutons au milieu et reverrouille-là. Clique le dernier bouton à droite:
"Classic Explorer Settings": Navigation Pane Style: choisi "Windows XP
Simple". Coche tout. A-Clique en bas sur: "More Settings", clique
OK
et voir le document Word sur la ligne suivante pour voir quoi changer:
Doc. Word to read:
voir en rouge quoi changer pour ajouter les boutons
Refresh, etc...ou encore copie et colle tout le contenu de
ce texte (english icons)
ou de
ce texte (icônes francaises)
dans le document "Explorer" de l'étape A.
Puis va dans:
Démarrer / Programmes / ClassicShell / Start Menu Settings /
coche: "Show Log Off", clique OK.
Sous Windows 8.1: pour faire apparaître les
icônes: View / Options (clique
sur le petit triangle noir pour défiler le menu) / sélectionne: Classic Explorer
Bar.
Sous Windows 7: clique droit sur la barre en haut et sélectionne: Classic
Explorer Bar.
If you really want the last version -
Si tu veux vraiment la dernière version:
http://www.classicshell.net/
http://classicshell.sourceforge.net/
Ce programme donne une idée des icônes mais
les chiffres
n'ont pas l'air à adonner:
View Icons in Shell32.dll .exe
Mieux: ce programme pour voir le nom
des icônes de
C/Windows/System32/shell32.dll et imageres.dll:
GConvert-limité à 15 jours
.exe
Voici ce que j'ai réussi à sauver avec
GConvert:
shell32_and_imageres_icons_and_names.rar
et
cette page
montre comment j'ai fait, et aussi vous
trouverez à la
fin de cette même page une image des icônes que j'ai pu trouver dans
"C: / Windows / system32 / shell32.dll et imageres.dll" ainsi que leur noms.
(oups, je vois que dans mon fichier
shell32_and_imageres_icons_and_names.rar
les icones sont en format .jpeg, pour les convertir en .ico utilise
ToYcon_0.9 .zip)
(NOTE: YOU CAN USE AN IMAGE .bmp, IT
WILL BE TAKEN AS
AN ICON)
(NOTE: TU PEUX UTILISER UNE
IMAGE .bmp, ELLE SERA CONSIDÉRÉE COMME UNE ICÔNE)
**************************************************************************************
It's also possible to save an image as
an icon with
Irfanview.
-----------------------------------------------------------------------------------------------------------------------------------------------------------------
Paragon Backup &
Recovery Free 2013 &
2014:
Similar to,
semblable
à Acronis.
For Windows XP, V, 7, 8.x, 10:
PRODUCT KEY v.2013: PSG-255-FRE-PL-624038016
SERIAL NUMBER: 0944B-6508A-C6329-DD170
Sauvegarde rapidement vos fichiers et dossiers, votre système d’exploitation,
l’intégralité de votre
disque dur sur le support de stockage de votre choix avec possibilité
d'effectuer des sauvegardes
différentielles (c.a.d. uniquement les données modifiées depuis la dernière
sauvegarde).
Il garantit la protection de votre système et de vos données importantes et vous
offre la possibilité
de les restaurer en cas de sinistre ! Créez un clone parfait sur une partition
distincte ou sur un
disque dur. Migrez des systèmes existants et démarrez-les dans un nouvel
environnement matériel.
Excluez facilement certains fichiers et dossiers lorsque vous copiez une
partition ou un disque dur
sur un nouveau périphérique. Cette fonction est particulièrement utile lorsque
vous réalisez une migration
vers un disque dur disposant de moins d’espace que sur votre ancien disque dur.
Prise en charge des disques
durs AFD (Advanced Format Drive), de plus de 2 To et désormais compatible avec
Windows 8.
The latest 2014 edition adds full
support for Windows 8.1, Storage Spaces and UEFI. It also introduces a New
Backup
Format tab, allowing users more flexibility with backing up by using a new pVHD
(Paragon Virtual Hard Drive) format.
There’s also a refreshed UI and updated recovery media builder added, allowing
users to create a Linux-based recovery disc.
ATTENTION: DES FOIS C'EST MIEUX DE FORMATTER C AVANT DE RESTAURER
PARCE QUE LA RESTAURATION N'EFFACE PAS TOUT.
ATTENTION: SOMETIMES IT'S BETTER TO FORMAT C BEFORE TO RESTORE
BECAUSE THE RESTORATION DOESN'T DELETE EVERYTHING.
Page de téléchargement en
francais:
https://www.paragon-software.com/fr/home/br-free/download.html
Page for download in english:
https://www.paragon-software.com/home/br-free/download.html
-----------------------------------------------------------------------------------------------------------------------------------------------------------------
LES COMPTES UTILISATEURS SOUS WINDOWS 7
(& 8 ALSO PROBABLY)
(english lower)
-Windows 7:
Voici comment activer le compte
Grand-Administrateur sous
Windows 7 Intégrale.
Contrairement à Windows XP, le(s) compte(s) Administrateur(s) créés
sous Windows 7
ou lors de l'installation n’octroient pas les droits
suprêmes à l’utilisateur par mesure
de sécurité.
Tu auras peut-être besoin du compte
Grand-Administrateur qui donne
total accès au système, pour installer un programme, etc:
Panneau de configuration / Système et Sécurité
/ Outils d’administration /
Stratégie de sécurité locale / Stratégies locales /
Options de sécurité / dans le
volet de droite, double-clic sur
Comptes:
statut du compte Administrateur et
sur l’onglet Paramètre de sécurité locale,
cocher Activé,
puis Appliquer.
Le compte (grand)-"Administrateur" est désormais activé
et apparaîtra au démarrage de
Windows 7 ou en changeant d’utilisateur, sous le nom
"Administrateur".
Noter:
cette procédure est possible directement sous l'édition Intégrale de Windows 7.
Sous les éditions inférieures de Windows 7, il faudra intervenir dans la Base de
Registre, comme c’était déjà le cas sous Vista (voir ci-après).
Pour désactiver ce compte, il suffira de
cocher
Désactivé
dans
Paramètre de sécurité locale.
-Windows Vista & 7 toutes versions:
Voici comment activer le compte
Grand-Administrateur par le
registre.
(avant tu devras probablement désactiver
l'UAC, voir plus bas...)
Premièrement tu devras ouvrir l'invite
de commande en mode administrateur en cliquant-droit et choisi "Exécuter comme
administrateur".
Maintenant tape la commande suivante:
net user administrateur /active:yes
Tu devrais voir un message qui dit que la
commande s'est déroulée avec succès.
Ferme la session et tu vas voir le compte (Grand) Administrateur comme choix.
Comment désactiver le compte Grand-Administrateur:
(avant tu devras probablement désactiver
l'UAC, voir plus bas...) soit certain que tu es sur ton compte standard, et
ouvre l'invite de commande en
mode administrateur. Maintenant tape la commande suivante:
net user administrateur /active:no
Le compte Grand-Administrateur sera
maintenant désactivé, et n'apparaîtra plus à l'ouverture de la session.
Pourquoi utiliser
un compte Standard
(limité) au lieu d'un
compte
Administrateur (créé ou grand)?
UTILISE UN COMPTE STANDARD (LIMITÉ) RÉGULIÈREMENT.
ET UTILISE
LE COMPTE
GRAND-ADMINISTRATEUR SEULEMENT
TEMPORAIREMENT POUR
INSTALLER DES
PROGRAMMES:
Le compte Standard
aide à protéger ton ordinateur en empêchant les utilisateurs de faire des
changements qui affectent tous ceux qui utilisent l'ordinateur, comme
effacer un fichier requis pour faire fonctionner l'ordinateur. On
recommande de créer un compte Standard pour chaque utilisateur.
La plupart du monde
ont probablement déjà utilisé leur Windows avec un compte Administrateur (créé
ou grand). Quoique cela te rende les choses plus faciles parce que tu as
un accès presque total (Admin-créé) ou accès pleinement total (Grand-Admin),
cela signifie aussi que les applications exécutées à partir d'un
compte administrateur ont aussi un accès presque total ou pleinement total.
Pour des raisons de sécurité, il est recommandé d'utiliser un compte plus
limité (Standard) pour les activités quotidiennes. Utilise un compte
Administrateur (créé ou grand)
au besoin, comme pour installer un programme.
Cela signifie que si
un virus réussi à entrer dans ton ordi pour l'endommager, il peut faire
plus de dommages dans un compte Administrateur (créé ou grand) que dans un
compte Standard.....et probablement plus de dommages dans le compte Grand-Administrateur
que dans un compte Administrateur-créé.
Tu ne peux pas ouvrir le compte
Grand-Administrateur par le Panneau de Configuration/Comptes Utilisateurs,
voir plus haut comment activer le compte Grand-Administrateur. Les comptes
Administrateurs que tu peux créer par le Panneau de Configuration/Comptes
Utilisateurs te donnent plus de pouvoir que les comptes Standards mais te
donnent moins de pouvoirs que le compte Grand-Administrateur.
THE USER ACCOUNTS UNDER WINDOWS 7
-Windows 7:
Here is how to activate the account Great-Administrator under
Windows 7 Ultimate.
In the contrary of Windows XP, the account(s) Administrator(s) created
under Windows 7
or during the installation
doesn't give the highest rights to the user for raisons of security.
You maybe will need the account Great-Administrator which give total access
to the system, to install a program, etc:
Control
Panel
/ System and Security / Administrative tools / Strategy security
local / Strategy locals / Security
options / on the right, double-click on
Accounts:
statut Account Administrator /
Local
Security
Settings
/
select
Enabled, then Apply.
The account (great)-"Administrator" is now activated
and will
appear at the startup of Windows 7 or when changing user, under the name
of
"Administrator".
Note: this is possible directly under
Windows 7 Ultimate.
For the
other versions of
Windows 7, you have to deal with the Registry, as it was the case
with Vista (see after).
To disable this account, you will have to
select
Disabled
in
Local
Security
Settings.
-Windows Vista & 7 all versions:
Here is how to activate the account Great-Administrator
via the registry.
(before, you probably will have to disable the UAC, see lower...) First you’ll need to open a command
prompt
in administrator mode by right-clicking and choosing “Run as administrator” (or
use the Ctrl+Shift+Enter
shortcut from the search box). Now type the following
command:
net user administrator /active:yes
You should see a message that the
command completed successfully.
Log
out, and you’ll now see the (Great) Administrator account as a choice.
How to disable the Great-Administrator Account:
(before, you probably will have to
disable the UAC,
see lower...)
make
sure you are logged on as your
regular user account, and then open an administrator
mode command prompt
as above. Type the following command:
net user administrator /active:no
The Great-Administrator account will now be
disabled, and shouldn’t show up on the
login screen anymore.
Why to use a Standard
(limited) user account instead
of an
Administrator (created or great) account?
USE A STANDARD (LIMITED) ACCOUNT FOR DAILY USE.
AND USE THE
GREAT-ADMINISTRATOR ACCOUNT
JUST TEMPORARY
TO INSTALL SOME PROGRAMS:
The Standard account
can help protect your computer by preventing users from making changes
that affect everyone who uses the computer, such as deleting files that
are required for the computer to work. We recommend creating a Standard
account for each user.
Most people have
probably been using their Windows system with an Administrative (created
or great) account. While this makes things easier as you have almost total
access (Admin-created) or total access (Great-Admin) to everything on your
computer, this also means that applications that run from an administrator
account also have almost total or total access. For security reasons, it
is advisable to use a more limited account (Standard account) for your
day-to-day activities, and then use the Administrative (created or great)
account when needed, such as installing software.
It means that if a
virus succeed to enter in your computer to do damages,
it can do more damages in an Administrator (created or great) account
than in a Standard account.....and probably also more damages in the
Great-Administrator account than in a created-Administrator account.
You cannot open the Great-Administrator account
via the Control Panel/User Accounts, see up how to activate the Great-Administrator account.
The Administrator accounts that you can create via Control Panel/User
Accounts give you more power than the Standard accounts but less power
than the Great-Administrator account.
******************************************************************
-Windows XP, V, 7: Pour rendre la mise en
veille prolongée indisponible
(avant tout il te faudra désactiver l'UAC, voir plus loin...)
procédez
comme suit: (Si tu as 2 gig de ram tu vas
gagner 2 gig d'espace, si 4 gig
ram = 4 gig d'espace de gagné, etc.)
1. Cliquez sur Démarrer, puis tapez cmd dans la zone Rechercher.
2. Dans la liste des résultats de la recherche,
cliquez avec le bouton droit sur
Invite de commandes, puis cliquez sur
Exécuter en tant qu'administrateur.
3. Lorsque vous y êtes invité par le contrôle de
compte d'utilisateur,
cliquez sur Continuer.
4. À l'invite de commandes, tapez
powercfg.exe /hibernate off, puis
appuyez sur
Entrée. ( ou
powercfg -h off )
5. Tapez exit, puis appuyez sur Entrée pour fermer la
fenêtre d'invite de
commandes.
J'aime à désactiver la mise en
veille prolongée avant de créer une Image
Acronis (ou autre), ça fait une Image moins grosse, donc plus rapide à
restaurer, quitte à réactiver la mise en veille prolongée après la
restauration.
I like to disable the
hibernation before to create an Image Acronis (or other),
that make a smaller Image and it's faster to restore, and you can
reactivate
the hibernation after the restoration.
Pour rendre la mise en
veille prolongée disponible,
procédez
comme suit :
1. Cliquez sur Démarrer, puis tapez cmd dans la zone
Rechercher.
2. Dans la liste des résultats de la recherche,
cliquez avec le bouton droit sur
Invite de commandes, puis cliquez sur
Exécuter en tant qu'administrateur.
3. Lorsque vous y êtes invité par le contrôle de
compte d'utilisateur,
cliquez sur Continuer.
4. À l'invite de commandes, tapez
powercfg.exe /hibernate on, puis
appuyez sur
Entrée. ( ou
powercfg -h on )
5. Tapez exit, puis appuyez sur Entrée pour fermer la
fenêtre d'invite de
commandes.
-------------------------------------------------------------------------------------
-Windows 7:
Control Panel: "Start Navigation": put NO sound, this
sound
drive me nut!
- Panneau de Configuration: "Démarrer
la Navigation": ÔTE ce son: il me rend fou!
|
-------------------------------------------------------------------------------------
|
-Disques plus que 2 tera, si lit juste 2 tera: Panneau Configuration /
Outils d'Administration / Computer Management / Disk Management: efface
toutes les partitions et à gauche sur le carré: clique droit et clique:
Converti en disque GPT.
-Hard disks higher than 2 tera, if it
reads only 2 tera: Control Panel / Administrative tools / Computer
Management / Disk Management: delete all partitions and on left on the
square: click right and click: Convert to GPT disk.
-Windows Vista:
Installe le SP 2: l’ordinateur semble plus rapide après.
-Pour retrouver mon icône du son sur la
barre des tâches: control+alt+delete et arrête les 2 explorer.exe,
puis si nécessaire ferme l'ordi démarre-le.
-To put
back the icon of the sound on the taskbar: control+alt+delete and stop the
2 explorer.exe,
then if necessary close the computer and restart it.
-Windows 7: Le "start menu-menu
démarrer" qui dans XP se trouvait dans:
C / Documents and Settings / All users / Menu Démarrer /
Programmes se trouve dans 7: C / ProgramData /
Microsoft / Windows / Start Menu / Programs
(pour accéder à "ProgramData"
vous devez sélectionner l'option par l'explorer: Tools / Folder Options: Show
Hidden Files)
-Windows 8.1:
Remettre un menu "démarrer" dans
Windows 8 sans installer de logiciel tiers:
vous cliquez dans la
barre des tâches, en bas
de votre écran, avec le clic droit, puis dans
"barre d'outils" et
"nouvelle
barre d'outils". Ensuite vous allez dans
"C" puis
"ProgramData"
(pour accéder à "ProgramData" vous devez sélectionner l'option par l'explorer:
Tools / Folder Options: Show Hidden Files) puis
"Microsoft" puis
"Windows" (bien dans CET ordre), puis vous sélectionnez sans l'ouvrir le dossier
"Menu Démarrer" et vous cliquez en bas sur
"Sélectionner un dossier" et poum-là!,
vous aurez "menu démarrer" qui s'affichera dans la barre d'outil en bas à
droite.
-Windows 7: Le "start menu-menu
démarrer" qui dans XP se trouvait dans:
C / Documents and Settings / All users / Menu Démarrer /
Programmes se trouve dans 7: C / Program Data /
Microsoft / Windows / Start Menu / Programs.
-Windows 7:
Thème Windows Classique: attention, ça va désactiver Aéro, faites ceci
seulement si vous avez un ordinateur pas trop puissant.
Control Panel-Panneau de configuration: (Afficher par: Catégorie), Apparence et Personnalisation /
Modifier le thème:
"Windows Classique".
Si tu as choisi Windows Classique,
fait ça aussi: Control Panel: (Afficher
par: Grandes Icônes), /
Système / Paramètres Système Avancé / Performances / Paramètres /
Paramètres personnalisés: coche seulement
«Afficher des miniatures au lieu d’icônes» et «Utiliser des ombres pour le
nom des icônes sur le bureau».
-Windows 7:
Écran de veille: Control Panel: (Afficher par: Catégorie), Apparence et Personnalisation
/ Personnalisation /
Modifier l'écran de veille: moi j'aime bien:
"Aucun".
-Windows 7:
Résolution de l'écran: Control Panel (Afficher par:
Catégorie), Apparence et Personnalisation / Modifier la résolution de
l'écran: "Étendre ces affichages", "1440 x
900". (pour mon laptop Toshiba 17 po.)
-Windows 7:
Modifier PPP: Control Panel (Afficher par:
Catégorie), Apparence et Personnalisation / Modifier la résolution de
l'écran: Rendre le texte et d'autres éléments plus petits ou plus grands /
Définir la taille du texte personnalisé (PPP):
"140 %" pour
les laptops, mais pour une tour avec un grand écran: laisser
par défaut. Pour appliquer, pas besoin de redémarrer l'ordinateur, seulement fermer et rouvrir la
session.
OU / OR:
-Windows 7 & 8.1:
Desktop: bouton droit: personalize / Windows Colors
/ Advanced Appearance Settings / Icon+Menu Font default: 9, met 10 +
Scrool Bar default: 17, met 20.
-Windows 7:
Icônes du bureau:
Control Panel: (Afficher par: Catégorie), Apparence et Personnalisation /
Modifier le thème / à gauche: Changer les icônes du bureau:
coche: "Ordinateur" + "Panneau de Configuration" +
"Corbeille".
-Windows 7:
Icônes sur le bureau: Clic droit sur le bureau /
Affichage / coche: "Petites Icônes". Décoche: "Aligner sur la grille".
Coche: "Réorganiser automatiquement les icones".
-Windows 7:
Taille des icônes sur le bureau:
Control Panel: (Afficher par: Catégorie), Apparence et Personnalisation /
Modifier le thème / en bas: Couleur de la fenêtre: Choisissez les éléments
à modifier, moi j'aime bien les Icônes:
taille = 20: pour les laptops. Laisser par défaut pour les grands écrans.
-Windows Vista: ....."...../ Couleur et apparence des
fenêtres / Avancé / Icônes:
taille = 20: pour
les laptops. Laisser par défaut pour les grands écrans.
-Windows Vista:
Contrôle comptes
utilisateurs: Control Panel / Comptes
d’utilisateurs / Activer ou désactiver le contrôle des comptes
utilisateurs / UAC:
décoche: «Utiliser le
contrôle............». Ça va être moins achalant, le système ne posera
plus de questions. Bon, si tu veux être plus protégé, laisse-le
activé.
-Windows 7:
Contrôle comptes
utilisateurs: Control Panel: (Afficher
par: Catégorie), Comptes et protection des utilisateurs / Comptes
d'utilisateurs / Modifier les paramètres de contrôle de comptes
d'utilisateurs: si tu le laisses
par défaut, c'est pas trop achalant. Mais si tu trouves ça
encore trop achalandé de questions, met l'option en bas complètement et
clique sur OK. Bon, si tu veux
être plus protégé, laisse-le par défault.
-Windows Vista:
Transparence des fenêtres:
Control Panel: /
Personnalisation / Couleur et Transparence des Fenêtres /
décoche: «Activer la transparence des
fenêtres».
-Windows 7:
Nom de l'ordinateur:
Control Panel / Système /
Paramètres Système Avancé / Nom de l’ordinateur:
choisis-toi un beau nom.
-Windows 7:
Protection du système:
Control Panel (Afficher par: Grandes Icônes) / Système / Paramètres
Système Avancé / Protection du système / Sélectionne la ou les partitions
/ Configurer /
coche: Désactiver la protection du
système. (ça empêche le
système de créer des points de restaurations qui peuvent prendre 2 gig ou
plus d'espace sur le disque dur, aussi ça rend l'ordinateur plus vite. Moi j'ai
pas besoin de ça vu que j'ai une image Acronis, ce qui est bien mieux que
ces points de restauration ! Bon, tu peux le laisser activé si tu veux.)
-Windows 7:
Barre des tâches:
Clique droit sur la Barre des
tâches en bas: décoche:
"Verrouiller la barre des tâches".
-Windows Vista:
Barre des tâches:
Clique droit sur la Barre des tâches en bas: Propriété /
coche: Conserver... et Lancement
rapide. / Menu démarrer:
pas classique: bogue, en tous cas retester.
/ Zone de notification:
décoche: «Masquer icônes inactives», coche les
autres.
-Windows 7:
Icônes de la barre des tâches et
notifications:
Clique droit sur la
Barre des tâches en bas:
Propriété / Barre des tâches /
laisse décoché: "Utiliser des petites Icônes". /
Zone de notification / Personnaliser: Affiche
les icônes que tu veux ou laisse par défaut.
-Windows 7:
Ouvre Windows Explorer
/ Organiser (à gauche) / Disposition: coche: "Barre de menus".
/ Affichage:
décoche «Barre
d’état». / Outils / Option des dossiers /
Affichage: coche:
"Afficher le chemin complet dans la barre de titre" (thème
classique uniquement), et "Afficher les fichiers + dossiers + lecteurs
cachés" et laisse décoché: "Ouvrir les
fenêtres des dossiers dans un processus différent".
-Windows 7:
Ouvre Windows Explorer:
met l'Affichage en "Détail"
(icône à droite
en haut) et va dans:
Outils / Option des dossiers / Affichage /
clique sur: "Appliquer aux dossiers", comme cela ça va toujours ouvrir en
Détail. Et va
encore dans: Outils / Option des dossiers / Général / Volet de Navigation:
parfois j'aime mieux cocher les 2: "Afficher..." et "Développer..."
-Windows 7:
Options
d’alimentations: Control Panel: (Afficher
par: Grandes Icônes) /
Options d’alimentations / Demander un mot passe...: les 4:
Ne rien faire. /
Choisir l’action du bouton...: les 4: Ne rien
faire. / Choisir quand éteindre et modifier
l’écran: BATTERIE / Estomper l'affichage:
2
min. / Éteindre l'écran:
5 min. / Mettre l'ordi
en veille: Jamais. /
SECTEUR: Estomper l'affichage: Jamais.
/ Éteindre l'écran:
10
min. / Mettre l'ordi en veille:
Jamais.
(Moi c'est mon goût, tu fait comme tu veux !) /
Require a password on wake-up: "When I press the power button: "Shut
down".
-Windows 7:
Services à désactiver:
Control Panel: (Afficher par: Grandes Icônes)
/ Outils d’administration / Services: si
nécessaire désactive: «Pare-feu Windows», «Superfetch» et «Rapport
d’erreur» et "Windows Updates".
-Windows 7:
Pare-feu Windows:
Control Panel: (Afficher par: Catégorie) / Système et Sécurité / Pare-feu
Windows / à gauche: "Activer ou
désactiver le Pare-feu Windows": fait comme tu veux, moi des fois je le
désactive.
-Windows 7:
Mises à jour Windows:
Control Panel: (Afficher par: Catégorie) / Système et Sécurité / Windows
Update / Modifier les paramètres:
"Vérifie les update mais laisse-moi choisir quand les télécharger et les
installer".
-Windows 7:
Défragmenteur de disque: Démarrer / Tous les programmes /
Accessoires / Outils système / Défragmenteur de disque:
j'ai désactivé la défragmention planifiée, je n'aime pas qu'on décide pour
moi.
-Windows 7:
Pour connecter un lecteur réseau ça va assez
bien mais quand il est caché, faire comme ceci: Ouvre Windows Explorer /
Outils / Connecter un lecteur réseau / Lecteur: choisi la lettre.
/ Dossier: \\nom_de_l'ordinateur\nom
du_dossier_suivi_du_$, coche: "Se connecter à l'ouverture de session",
clique sur "Terminer".
-Windows Vista:
Les gadgets à droite:
tu peux les fermer et décocher:
"Afficher au démarrage".
Aussi: Control Panel / Apparence et Personnalisation
/ Propriété du volet Windows / décoche:
«Démarrer le volet Windows...» (7:
je n'avais pas de gadgets, si tu en as j'imagine que tu peux faire comme
pour Vista si tu veux les ôter. Pour les activer: clic sur le Bureau
bouton droit: Gadget)
-Windows Vista:
Connexions Réseau:
Control Panel: (Affichage classique)
/ Centre Réseau et Partage / Gérer les Connexions
Réseau / LAN et Wireless / Propriété / TCP/IPv4:
.....automatiquement. (IP fixe si nécessaire). S'il y a lieu coche: Enr. réseau et Lancer autom.
-Windows 7:
Connexions Réseau:
Control Panel: (Afficher par: Grandes Icônes)
/ Centre Réseau et Partage / Modifier
les paramètres de la carte / LAN et Wireless / Propriété / TCP/IPv4:
.....automatiquement. (IP fixe si
nécessaire). S'il y a lieu coche: Enr. réseau et Lancer autom.
-Windows 7:
Internet Explorer 8
/ Option: j'aime "Page
vierge". /
Clique droit sur la barre en haut:
coche seulement "Barre de menus" + "Bouton Affichage de compatibilité" +
"Barre de commandes" + "Barre d'état".
/ Affichage / Taille du texte: "La plus grande-Largest".
Si nécessaire: pour activer le script pour les pages scriptées qui
demandent un mot de passe: Outils / Options internet / Sécurité /
Personnaliser le niveau / Autoriser les sites Web à demander des
informations à l'aide de fenêtres scriptées:
coche "Activé".
-Windows Vista: Serveur Web
(service IIS): j'ai testé sur Vista Home Edition et ça marche: Control
Panel / Programmes et fonctionnalités / Activer ou désactiver des
fonctionnalités Windows: coche:
IIS. IIS:
en haut: «Ajouter un site web»,
port...etc... Liaison / modifier
/ Port: xxxx.....
(J'ai vu que sur 7 Ultimate on peut installer le Service IIS, ça doit se
faire comme avec Vista)
-Windows 7:
Serveur Web
(service IIS): j'ai testé sur 7
Home Premium et ça marche, ça va sûrement marcher sur Ultimate: Control
Panel / Programmes et fonctionnalités / Activer ou désactiver des
fonctionnalités Windows: coche:
IIS. Étape A:
Control Panel: (Afficher par: Grandes Icônes)
/ Outils d'administration /
Gestionnaire des services Internet (IIS) / Standard-PC / Sites / Default
Web Site / à droite:
Modifier le site / Liaisons: Type:
http, Port: 80 (par défault). (tu devras peut-être aussi ouvrir le port sur ton
routeur), Adresse IP de l'ordinateur, tu dois en mettre une fixe, pas
auto.
Répéter l'étape A jusqu'à:
à droite:
Modifier le site / Paramètres de base /
Chemin d'accès physique: choisi ton dossier où sera ton wwwroot. ATT:
Basic settings / Application pool: "Classic .NET App.pool".
IL TE FAUDRA PROBABLEMENT DÉSACTIVER LE
PARE-FEU DE WINDOWS ET TOUT AUTRE PARE-FEU OU RENTRER DES AUTORISATIONS.....
-Windows 7:
Vérifie que les 4 Cibles (Documents + Photos + Videos + Images)
pointent vers la partition D: bouton droit / Propriété / Cible:
sélectionne D et clique OK, ne clique pas sur : "Déplacer" et ça va
marcher...... Et met l’icône en bas à gauche (voir plus bas
pour savoir comment faire). Ou encore tu peux créer 4 dossier dans D: Mes
Documents,
Mes Photos, Mes Vidéos, Mes Images, et faire pointer les 4 cibles
respectives vers les 4 dossiers respectifs, mais moi j'aime mieux qu'ils
pointent tous vers la même partition, soit D.
-Windows 7:
Épingler un dossier à la barre des
tâches. Cette astuce permet
d'ajouter un raccourci vers un dossier dans la barre des tâches de Windows
7. En effet, il n'est normalement pas possible d'épingler des raccourcis
vers des fichiers ou dossiers dans la barre des tâches de Windows, seules
les applications ont cette possibilité. L'astuce consiste donc à créer un
raccourci vers l'explorateur de fichier qui va ouvrir directement le
répertoire de notre choix. Voici donc la marche à suivre pour créer puis
ajouter le raccourci d'un dossier dans la barre des tâche.
Sur le bureau, effectuez un clic droit
et choisissez "Nouveau" puis "Raccourci".
Dans la boîte de dialogue venant
de s'ouvrir, cliquer sur le bouton "Parcourir" afin de choisir le dossier
de votre choix puis validez en cliquant sur OK. Dans la fenêtre restant à
l'écran, ajouter -exemple: C:\windows\explorer.exe(espace)D:\
devant le chemin puis valider.
Votre raccourci est maintenant
présent sur le bureau. Il suffit simplement de le déplacer dans la barre
des tâches à l'aide de la souris.
OU ceci est probablement plus
rapide:
http://www.pcastuces.com/pratique/windows/7/epingler_lecteur/page1.htm
-Windows 7:
Retrouver sa barre d'outils comme sous
XP:
- Clic droit sur la barre des tâches ->
propriété
- Dans l'onglet "Barre des
tâches":
- Cocher "Utiliser de petites
icônes"
- Pour
"Boutons de la barre des taches"
sélectionner
"Ne jamais combiner"
- Appliquer les changements puis cliquer sur
"Personnaliser"
- Cocher "Toujours afficher
toutes les icônes et
notifications sur la barre des tâches"
- Valider
- Cliquer sur OK
- Refaire un clic sur la barre des taches
- "Barre d'outils" -> "Nouvelles
barre d'outils"
- Sélectionnez un dossier
- Déverrouillez la barre des taches afin de positionner à gauche la barre
"Quick launch" qui vient d'être créée.
- Clic droit sur "Quick launch" puis
désélectionnez les options "afficher le
texte" et "afficher le titre"
Vous avez retrouvé une barre des tâches utilisable ! Ne reste plus qu'à
"décrocher" les programmes par défaut et le tour est joué.
-Windows 7:
Partager un fichier sous Windows 7
pour que tout le monde en ait accès sous Windows
XP sans que le système demande
un mot de passe (pour plus de protection, faites vos tests vous-même, j'ai
pas testé):
A-Met-toi sous le même Groupe que les autres ordis en réseau, soit
Workgroup ou MSHOME: Control Panel / System / Advanced Setting System /
Computer Name / Change / Workgroup: Workgroup ou MSHOME ou.....
B-Pour ne pas que ça demande un
mot de passe: dans l'explorateur de
Windows 7, à gauche: clic Homegroup / View Homegroup settings / Share
library & printer:
coche tout ou
à ton choix. Control Panel:
"Network and Sharing Center": clic "Change advanced sharing settings",
et dans "Home or Work" and "Public": sélecte
"Activer la découverte d'un
réseau" + "Activer le partage de fichiers et d'imprimantes" + "Activer le
partage afin que toute personne..." + "Use 128 bit..." + "Turn off password protected sharing"
+ "Allow Windows to manage..."
C-Sous Windows 7, clic sur le dossier à partager avec le bouton droit /
Propriété-Property / Partage-Sharing / Partage avancé-Advanced Sharing:
coche la boîte de sélection et
clic OK
et
clic sur le même dossier partagé avec le bouton droit / Propriété-Property / Partage-Sharing /
Share... / choisi "Tout le monde-Everyone", clic Add, puis clic sur Everyone en bas
et choisi "Read" pour lecture
seule ou
"Read/Write" si tu veux que les autres
puissent mettre de quoi dans le dossier partagé.
D-Ou plus simple: clique droit
sur le dossier à partager:
"Share with specific people..." / "Everyone-Tout-le-monde"
/ "add" / "Read" pour lecture
seule ou
"Read/Write" si tu veux que les autres
puissent mettre de quoi dans le dossier partagé. / "Share" / "Done".
-Windows 7:
Voici comment retrouver l'icône "Afficher le bureau" sur
la
barre
des tâches en bas à gauche:
Sur un espace vide du Bureau, d’un clic
droit,
sélectionner "Nouveau", puis "Raccourci".
Dans l’emplacement de l’élément, copier-coller:
%SystemRoot%\explorer.exe
%APPDATA%\Microsoft\Internet
Explorer\Quick Launch\Shows Desktop.lnk
puis cliquer sur "Suivant". Taper "Bureau" pour le nom du raccourci et cliquer
sur "Terminer". Clic-droit sur la nouvelle icône Bureau et sélectionner
"Propriétés".
Dans l’onglet Raccourci, cliquer sur "Changer d’icône". Dans le
cadre
Rechercher des icônes dans ce fichier, copier-coller:
%SystemRoot%\system32\imageres.dll
et cliquer sur OK. Sélectionner l’icône
du Bureau et valider par OK. Dans les Propriétés, la nouvelle icône
apparaît.
Cliquer sur Appliquer. Le nouveau raccourci Bureau est créé. D’un
clic-droit
sur ce raccourci Bureau, cliquer sur "Épingler dans la Barre des tâches". Le
Bureau est épinglée dans la Barre des tâches et on peut la positionner où
l’on veut.
(Cette
astuce n'a pas fonctionnée sur certains ordinateurs).
-Windows 7:
Changer la configuration du clavier:
Control Panel / Region and Language / Keyboards and
Languages / Change Keyboards.....
-Windows 8.1:
Changer la configuration du clavier:
Control Panel / Language / .....
-Windows 7:
GodMode:
Une astuce permet de centraliser
la configuration d’un nombre
important de paramètres dans Windows 7, c’est ce que
Microsoft appelle
le GodMode. Pour l’activer, rien de plus simple. Il suffit de
créer un nouveau
dossier n’importe où sur votre disque dur, depuis l’Explorateur Windows de
7.
Une fois le nouveau dossier crée, il suffit de le
renommer ainsi:
GodMode.{ED7BA470-8E54-465E-825C-99712043E01C}
Si tout a bien fonctionné, le
dossier devrait avoir changé d’icône pour
ressembler à un module du panneau de configuration. Lorsque l’on double
clique dessus, on accède alors à un menu permettant de paramétrer Windows
et les comptes d'utilisateurs. On ne peut pas néanmoins utiliser cette
manipulation pour configurer une machine à distance.
(ça marche sur Windows 7, 32 et 64 bit.
ça marche sur Windows Vista, 32 bit.
ça crash sur Windows Vista, 64 bit.)
---------------------------------------------------
-Windows 7:
Pour les
paranos: Désactiver les espions:
1-Panneau
de Configuration / Grandes icones / Centre de Maintenance /
Modifier les Paramètres:
décoche tout.
2-Panneau
de Configuration / Grandes icones / Centre de Maintenance / Modifier les
Paramètres / Paramètres
des rapports de problèmes / coche: "Ne jamais rechercher des solutions..."
3-Panneau
de Configuration / Grandes icones / Centre de Maintenance / Modifier les
Paramètres / Paramètres
du Programme d'Amélioration de l'Expérience Utilisateur / coche: "Non je
ne veux pas participer..."
4-Aide
et Support Windows / Options /
Paramètres / décoche:
"Participer aux programmes..."
5-Windows
Media Player / Options /
Confidentialité / décoche: "Je souhaite participer..."
6-Word
2007-2010 / Options / Centre de Gestion de Confidentialité /
Options de Confidentialité /
décoche: "Télécharger régulièrement..." et "S'inscrire au programme..."
7-Windows
Média Center: "Continuer..." / "Mise en route...":
coche: "Non je ne
souhaite pas participer..." et "...ne pas me connecter à Internet..."
8-Windows
Média Center / Paramètres / Général / Confidentialité /
Paramètres de Confidentialité / décoche: "Utiliser le guide..."
9-Windows
Média Center / Paramètres / Général / Confidentialité /
Paramètres de l'Expérience Utilisateur / décoche: "Envoyer des info..."
10-Microsoft
Default Manager / coche:
"Non je ne souhaite pas..."
11-Explorateur
des Jeux / Options /
décoche: "Collecter des info..."
12-Windows
Live Messenger / Options /
Confidentialité / décoche: "Contribuez à l'amélioration..."
13-Google
Chrome / Options /
Options Avancés / décoche: "Nous aider..."
14-Google
Earth / Outils / Options / Général /
Statistiques d'Utilisation / décoche: "Envoyer des statistiques..."
Source:
Désactiver les espions de Windows Vista et 7
---------------------------------------------------
-Windows all versions:
Si tu ne connais pas
le mot de passe d'un compte utilisateur Windows ou si tu l'as oublié, tu peux le
supprimer avec le programme DOS CHNTPW -
If you don't know the password of an account
Windows or if you forgot it, you can delete it with the program DOS CHNTPW:
-----burn this
ISO on a CD
-----boot
le-the cd,
-----boot: (fait-do enter)
-----Please select partition by number or
q = quit
d = automatically start disk drivers
m = manually select disk drivers to load
f = fetch additional drivers from floppy / usb
a = show all partitions found
l = show propbable Windows (NTFS) partitions only
Select: [1] a (fait-do enter)
-----Candidate Windows partitions found:
1 : /dev/sda1 40958MB BOOT
2 : .........................50000mb .............
Here you select one of the partitions listed above
or one of the letters from the menu: 1 ou-or 2.....
-----What is the path to the registry directory? (relative to windows disk)
[WINDOWS/system32/config] : windows/system32/config (fait-do enter)
-----1 - Password reset [sam system security]
2 - RecoveryConsole parameters [software]
q - quit - return to previous
[1] (fait-do enter)
Choice 1 is for password edit, most used.
-----1 - Edit user data and passwords
2 - Syskey status & change
3 - RecoveryConsole settings
- - -
9 - Registry editor, now with full write support!
q - Quit (you will be asked if there is something to save)
What to do? [1] -> (fait-do enter)
-----| 01f4 | Administrator | ADMIN | dis/lock |
| 01f5 | Guest | | dis/lock |
| 03e9 | petro | ADMIN | *BLANK* |
...or simply enter the user name to change .... : admin ou ...... (fait-do enter)
-----1 - Clear (blank) user password
2 - Edit (set new) user password (careful with this on XP or Vista)
3 - Promote user (make user an administrator)
(4 - Unlock and enable user account) [seems unlocked already]
q - Quit editing user, back to user select
Select: [q] > 1 (fait-do enter)
PASSWORD CLEARED !
-----...or simply enter the user name to change .... : ! (fait-do enter)
-----1 - Edit user data and passwords
- - -
9 - Registry editor, now with full write support!
q - Quit (you will be asked if there is something to save)
What to do ? q (fait-do enter)
------About the write file (s) Do it ? : y (fait-do enter)
Ôte le CD-remove the CD et fait-do control-alt-delete to reboot computer.
Sources:
http://www.pogostick.net/~pnh/ntpasswd/
http://www.pcastuces.com/pratique/windows/mot_passe_perdu/page1.htm

------------------------------------------------------------------------------------------------------------------------------------------------------------------------------------
SugarSync:
Access, Sync, and Share
your Files from Any Device:
https://www.sugarsync.com
(for all synchronizations and
transferts both computers
and cells must be connected to internet)
On the cell: SugarSync / Settings:
I select:
-AutoSync Folders + AutoSync Photos + AutoSync Videos
-Interval: 15 minutes -Wifi Only
1 - COMPUTERS <-------------> COMPUTERS:
To share many doc. of any size between computers,
the program creates a folder called: Magic Briefcase,
everything you put in this folder is synchronised
automatically between all the computers...
2- COMPUTERS+CELLS <--------> CELLS+COMPUTERS:
To share many doc. of any size between computers and cells,
the program creates a folder called: Mobile Photos,
everything you put in this folder is synchronised
automatically between all the computers but for the
cells you have to click on re-sync on the folder
Mobile Photos to update the changes...(I prefer to put only
small files on the folder Mobile Photos because
the cells has less place than a computer).
3- CELLS --------> COMPUTERS:
The photos and videos you take directly with the camera
of the cell will go automatically in the folder Mobile Photos
of the computers. To update the photos on the cell,
click on re-sync on the folder Mobile Photos.
4-
CELLS --------> COMPUTERS:
Any file on the cell: click upload, the file will go
automatically on the computer on the folder Magic Briefcase.
5-
COMPUTERS --------> CELLS:
On the computer, put any file on the folder Magic Briefcase,
and on the cell browse the folder Magic Briefcase then
click on the arrow on right and
SYNC, that will put the
file on the cell on the folder My SugarSync Folder.
To receive a notification on
the cell:
On the computer, put any file on the folder Magic Briefcase,
and on the website of SugarSync browse the file
on the folder Magic Briefcase, select the file and
at right click on Send to Mobile, and choose the mobile to
which you want to send the file, this will put the file
automatically on the cell and you will have a
notification: File synchronised.
6-
CELLS <--------> COMPUTERS:
Share any folder in the computer with the program
Sugarsync: this will synchronize automatically every 15 min.
the files in the computer and in the cell. In the cell you will find the
files in the My Sugarsync Folder. To synchronise manually in
the cell: browse the folder of the computer and click: sync.
Online help:
https://www.sugarsync.com/online-help/SugarSyncOnlineHelp.htm
-------------------------------------------------------------------------------------------
Android: pour améliorer le réseau: Wireless & Network / Mobile Network /
Network Mode: sélectionne GMS/WCDMA (Auto mode) (defaut: GMS only)
-------------------------------------------------------------------------------------------
Pour mon laptop Lenovo Ideapad
100s 141 BR:
Paragon 2014 (de 2012): version 90.00.003: ne peut pas créer de CD-bootable.
Paragon 2014 (de 2016): version 90.00.003: clé UBS bootable: ne voit pas C etc du Lenovo Id.100s.
Bios: ferme l'ordi, pèse sur le petit piton > Bios (ou Boot Manager):
-Par defaut: Windows 10 = Boot mode = UEFI: prends les 2: UEFI et
Legacy: le CD ne veut pas booter Paragon.
-Windows 10 = Boot mode = Legacy Support & Legacy First :
Windows Boot Manager: 4-->USB CD: SE-208-DB: graveur DVD USB (acheté
chez OrdiCentre):
boot Paragon mais ne voit pas C, et boot Acronis 10 et 2010 mais bogue.
MAIS JE CROIS QUE CA FONCTIONNE POUR BOOTER MACRIUM REFLECT.
Bios du Lenovo Ideapad 100s > Boot:
-Boot Mode: Legacy Support
-Boot Priority: UEFI First
-USB Boot: Enabled
-PXE Boot to LAN: Enabled
-Boot Priority Order:
1-->USB HDD: (Clé USB)
2-->eMMC Disk: ScanDisk i NAND 64GB: (Windows 10)
3-->Windows Boot Manager
4-->USB CD: (SE-208-DB: graveur DVD USB acheté
chez OrdiCentre)
5-->PCI LAN
6-->USB FDD
7-->ATA SDD
http://divers333.blogspot.ca/2017/12/lenovo.html
-------------------------------------------------------------------------------------------
-------------------------------------------------------------------------------------------
GOOGLE BLOG
Modifier l'adresse du blog, ATTENTION:
Paramètres>Edition>adresse blogspot:
http://---blog adress---/---adresse
du message---.html
Blog adress: NE LA CHANGE PAS
SINON TON ANCIENNE ADRESSE NE MARCHERA PLUS.
Adresse du message: Modifier: à droite, clique sur "lien permanent" et sélecte:
"Lien permanent personalisé": ............ .html, ensuite on ne peut
plus le modifier,
ANYWAY NE LA CHANGE PAS SINON TON ANCIENNE ADRESSE NE MARCHERA PLUS.
Un blog peut contenir plusieurs messages:
Ne pas créer d'autres messages dans mon blog:
juvdm's blogs-blogues de juvdm,
car je veux mettre seulement ce message:
"List of my blogs-Liste de mes blogues".
Ouvrir des liens dans une nouvelles fenêtre:
Clique sur: Lien>Modifier le lien>coche: "Ouvrir ce lien dans une
nouvelle fenêtre"
et décoche: "Ajouter l'attribut "re-nofollow".
-------------------------------------------------------------------------------------------
-------------------------------------------------------------------------------------------
VOICI LES
LOGICIELS QUE J'AI TESTÉS POUR SAVOIR
S'ILS SONT COMPATIBLES AVEC VISTA ET
7
Programmes testés avec
Vista-Home-Premium 32 bit SP-1:
--Acrobat 6 pro: PDF printer: NON
--Acrobat 7 pro: peut créer un PDF avec
un Word 2000 ouvert: OK
--Antivirus AVG, la dernière version: OK
--Antivirus Nod32 v.3.0.669-32 bit: NON
--Free FTP Client 3.2: OK
--Indesign CS2: OK
--Movie Factory 4: ?, v.5 et 6: OK. Met
la v.5-et-les-templates-de-la-v.4 si la
v.4 fait pas.
--Nero 66016: NON
--Nero 8: OK
--Office 2000, 2002 et 2007: OK
--Omnipage 15: NON
--Photoshop 7: OK
--WinDVD 5: OK
--WS FTP 2006 et 2007: NON
--WS FTP Pro v.9.01: OK
---------------------------------------------------
Programmes testés avec
Vista-Ultimate
64 bit SP-1:
--Acrobat 6 & 7 & 8 pro: PDF printer: NON
--Antivirus AVG, la dernière version: OK
--Antivirus Nod32 v.3.0.669-32 bit: NON
--Free FTP Client 3.2: ?
--Indesign CS2: ?
--Movie Factory 4: NON,
v.5 et 6: OK.
Met la v.5-et-les-templates-de-la-v.4.
--Nero 66016: NON
--Nero 8: OK
--Office 2000 et 2007: OK
--Omnipage 15: NON
--Photoshop 7: OK
--WinDVD 5: OK
--WS FTP 2006 et 2007: probable que NON
--WS FTP Pro v.9.01: ?
---------------------------------------------------
Programmes testés avec
7 Home-Premium & Ultimate 32
bit:
--ACD See 5
et 7: OK
--Acrobat 7, 8 et 9 pro: OK
--Acrobat 9 pro Extended: OK
--Acronis True Image 10: n'ai pas pu
l'installer sous Windows 7 mais j'ai pu créer une image sur une autre
partition et la restaurer avec le CD bootable. Mais pour la graver
sur DVD, j'ai dû la graver avec le logiciel de gravure fourni par Windows
7 pour qu'elle soit lisible sur le DVD, je l'avais gravé sous Windows 7
avec Nero 8 et BurnAware pro 2.3.5 mais le fichier image était illisible
sur le DVD. J'ai fait aussi ce test: j'ai copié l'image créée sous
Windows 7 sur un disque externe USB et je l'ai gravé sur un autre
ordinateur sous Windows XP avec Nero 6.6.0.16 et le fichier image était
parfaitement lisible sur le DVD ! (Étrange !)
--Acronis True Image 2010 (build 6
029): OK
--Adobe Master CS4: OK
--Antivirus AVG: OK
--Antivirus Nod32 v.3.0.669-32 bit:
NON
--Antivirus Nod32 v.4.0.467-32 bit:
OK
--Any DVD 6.6.3.4: OK
--Corel Draw 12 et FontNav: OK
--Corel Draw 14: OK
--Corel Video Studio 12: OK
--DB Power-full: OK
--DVDFab 7.0.3.0: OK
--DVDFab Passkey 7.0.1.2: OK
--Everest Home 2.20.405: OK
--Firefox 3.5-2009-juillet/july-6 + plug-in: OK
--Font Nav de CorelDraw.12: OK
--Incredimail 2 (5.7) et 2 (6.1): OK
--Indesign CS2: OK
--KM Player 2.9.4.1435: OK
--Microsoft Plus: OK
--Movie Factory 4: ?,
v.5 et 6: OK.
Met la v.5-et-les-templates-de-la-v.4.
--MP3 Splitter & Joiner 2.8: OK
--Music Match 7.5 + 9: OK
--Music Match 10: ?
--Nero 6 & 7: NON
--Nero 8 & 9.0.9.4: OK
--.net Framework 1.1: OK
--Office 2000 et 2007: OK
--Omnipage 15: NON
--Omnipage 16: OK
--Photoshop 7: OK
--Photoshop CS3: OK
--Power DVD 6 & 7: OK
--Radmin Server 2.1: NON
--Radmin Server 3.4: OK
--Sound Forge 8 et 10: OK
--Syncback 5.6.0.36: OK
--Tune Up 2008: NON
--Tune Up 2009: OK SUR CERTAIN ORDI, NON SUR
D'AUTRES...
--Tune Up 2010: OK
--VLC Player 1.0.5: OK
--WebcamFirst 2007, v.3.1.8: OK
--WebcamFirst v.4.0.13: NON
--WebcamFirst v.4.0.15: OK
--WinDVD 5: OK
--Win Rar 3.9-32 bit: OK
--WM Recorder 10 et 11: ok
---------------------------------------------------
Programmes testés avec
7 Home-Premium & Ultimate 64
bit:
--ACD See 5 et 7: OK
--Acrobat 7 pro: NON
--Acrobat 8 pro: NON
--Acrobat 9 pro et 9 pro Extended: OK
--Acronis True Image 2010 (build 6
029): OK
--Adobe Master CS4: OK
--Antivirus Nod32 v.4-64 bit:
OK
--Any DVD 6.6.3.4: OK
--Corel Draw 12: OK
--Corel Draw 14: OK
--DB Power-full: OK
--DVDFab 7.0.3.0: OK
--DVDFab Passkey 7.0.1.2: OK
--Everest Home 2.20.405: OK
--Firefox
3.5-2009-juillet/july-6 + plug-in: OK
--Font Nav de CorelDraw.12: OK
--Incredimail 2 (5.7) et 2
(6.1): OK
--Indesign CS2: OK
--Indesign CS3: OK
--KM Player 2.9.4.1435: OK
--Microsoft Plus: OK
--Movie Factory 5: OK.
Met-les-templates-de-la-v.4.
--Music Match 7.5 + 9: OK
--Music Match 10: NON
--Nero 8 & 9.0.9.4: OK
--Office 2000: OK
--Office 2002: OK
--Office 2007: OK
--Omnipage 15: NON
--Omnipage 16: OK
--Photoshop 7: OK
--Photoshop CS2: OK
--Photoshop CS3: OK
--Power DVD 6 & 7: OK
--Radmin Server 2.1: NON
--Radmin Server 3.4: OK
--Sound Forge 10: OK
--Syncback 5.6.0.36: OK
--Tune Up 2010: OK
--VLC Player 1.0.5: OK
--WinDVD 5: OK
--Win Rar 3.9-64 bit: OK
---------------------------------------------------
REGISTRY for Windows XP
(some works with Vista and 7, 8.x, 10)
Before doing any change, export the keys to be able to restore in case of bugs.
Avant de faire des changements, exporte les clés pour
pouvoir les restaurer en cas de bogues.
Voici comment virer le mouchard
Microsoft, pour Windows XP:
How
to remove the Microsoft spy, for Windows XP:
1.Menu Démarrer /
Exécuter-Start / Execute
2.Tapez la commande suivante-write this:
regsvr32.exe -u regwizc.dll
-click OK
Pour toujours afficher la fenêtre à gauche dans windows
explorer
To always view the left window in windows
explorer
HKEY_CLASSES_ROOT / folder /
shell / open / ddeexec: clic droit sur «(par default)»,
clic «modifier»: [ExploreFolder(«%l»,%l,%S)]
Pour que la mise-à-jour de l'heure de Windows se fasse plus souvent
To get the Windows time to update more often
HKEY_LOCAL_MACHINE --system--ControlSet001--Services--
W32Time--Timeproviders--NtpClient:
SpecialPollInterval: met celle-ci-put this: 3600 hexadecimale (default: 93a80 hexad.)
http://fspsa.free.fr/systray.htm
http://fspsa.free.fr/systray-erratique.htm
1-Toujours afficher toutes les icônes de la barre des tâches (à droite)
2-Toujours masquer toutes les icônes de la barre des tâches (à droite)
3-Revenir
à l'affichage normal des icônes de la barre des tâches (à droite)
4-Pour appliquer les changements du registre: Kill Explorer
1-Always show icons on the task bar (at right)
2-Always hide icons on the task bar (at right)
3-Come back to normal view of icons on the task bar (at right)
4-To apply changes of registry: Kill Explorer
Pour qu'Internet Explorer 8 ouvre toujours à la grandeur de
l'écran
To get Internet Explorer 8 always open full screen
HKEY CURRENT USER / Software / Microsoft
/ Internet Explorer / Main /
Window_Placement / Valeur par defaut:
0000 2C 00 00 00 00 00 00 00
0008 01 00 00 00 FF FF FF FF
0010 FF FF FF FF FF FF FF FF
0018 FF FF FF FF 00 00 00 00
0020 00 00 00 00 00 05 00 00
0028 DE 03 00 00 00 00 00 00
Pour qu’Internet Explorer 8 ouvre
fenêtre full, modifiez les 5 et 6 èmes lignes comme ci-après:
To get Internet Explorer 8
open full screen, modify lines 5 and 6 as those following lines:
0020 00 00 00 00 90 06 00 00
0028 DE 09 00 00 00 00 00 00
Pour que Windows démarre plus vite:
Par défaut, XP défragmente les fichiers du boot à chaque démarrage, ce qui ne
sert à rien si vous défragmentez souvent votre disque dur... Voici la procédure
:
Ouvrez regedit (menu Démarrer, Exécuter... et taper regedit) Allez à
HKEY_LOCAL_MACHINE / SOFTWARE / Microsoft / Dfrg / BootOptimizeFunction /
Modifiez la valeur de la clé Enable à N (Y par
défaut).
Enfin, redémarrez votre PC,
et lors de votre prochain démarrage, vous gagnerez quelques précieuses secondes
!
Comment éteindre son PC plus rapidement:
Pour Win95 / Win98 / Win98SE / WinME / WinXP. Ouvrez Regedit puis
HKEY_LOCAL_MACHINE \ System \
CurrentControlSet \ Control
Dans la fenêtre de droite, recherchez la
valeur chaîne
WaitToKillServiceTimeOut
Si elle n’existe, pas créez-la. Cliquez sur cette valeur et entrez la valeur
désirée
correspondant au temps de fermeture des services: de 1 à 20 (nombre de
secondes).
Sur XP, la valeur est à 20000 mili-seconde).
Remplacez-la
par 200.
PCAstuces Copier ou deplacer rapidement dossier
PCAstuces Copier ou deplacer rapidement fichier
Remove Folders from this PC, Windows 10.zip
************************
For any questions or comments,
send an email to:
Pour toute question ou
commentaire,
envoyez un email à:
judepotvin@yahoo.ca
************************
Liens vers
d'autres sites:
Links to other websites:
Enlace a otros sitios:
Linki do innych stron:
Emporter Windows 7 sur un CD
Gérer les bibliothèques sous Windows 7
How To Slipstream Windows 7 SP1 Into Installation DVD ISO
You have to use the version build 2.6.0 of
RT Seven Lite
Créer un
DVD ou un fichier ISO Windows 7 intégrant le SP1
Il faut utiliser la version build 2.6.0 de
RT Seven Lite
Le ver qui se propage via les supports
USB (Zebulon)
Le
ver qui se propage via les supports USB (PC Astuce)
Les Keyloggers
*****
AUTRES LIENS - OTHER LINKS
FIN DE LA PAGE - END
OF THE PAGE
|